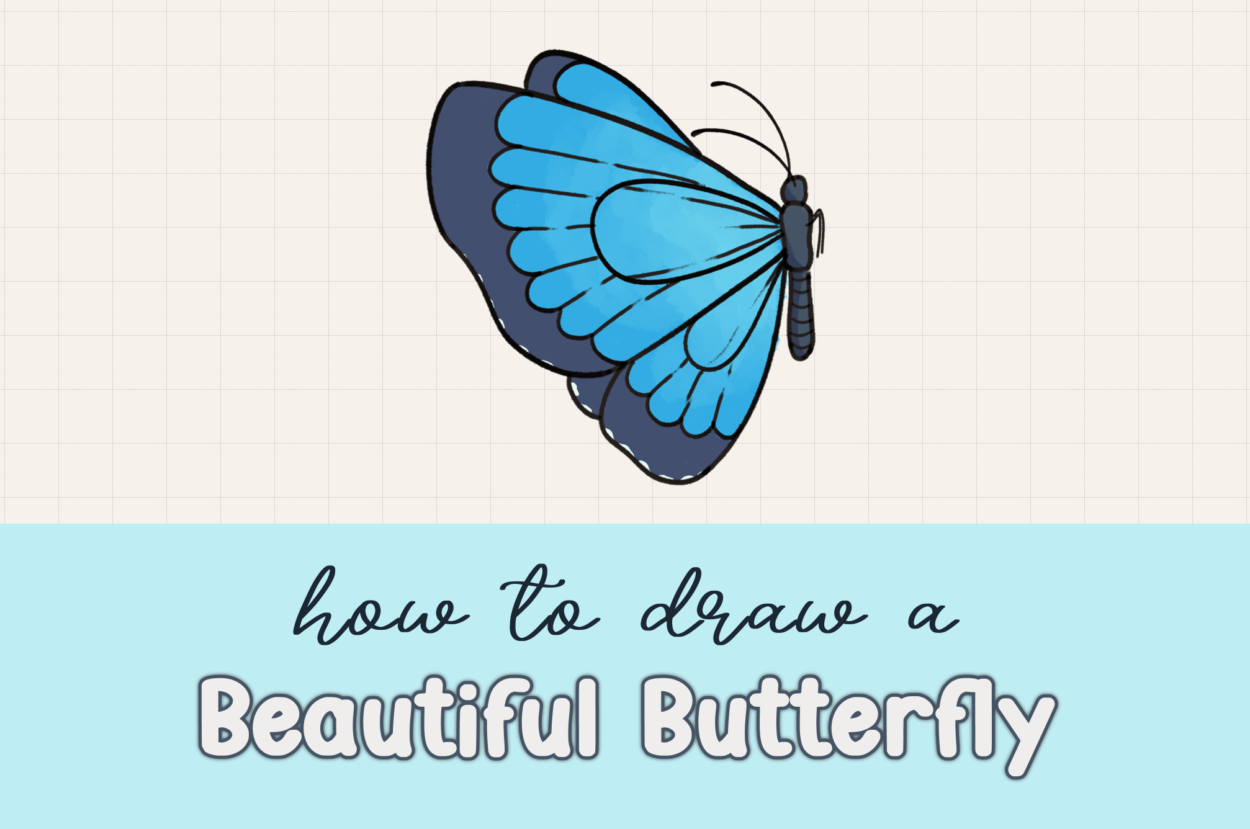
I visited a butterfly garden recently, and it was absolutely magical! Seeing all those butterflies dancing through the air in their brilliant colors – electric blues, sunset oranges, deep purples, and shimmering greens – completely took my breath away. Each one seemed to move like a living piece of art, their delicate wings catching the sunlight as they fluttered from flower to flower. That incredible experience inspired me to capture their beauty on my tablet, and I knew I had to share this joy with you!
But here’s the thing – when you first look at a butterfly, it can seem incredibly complicated to draw. Those intricate wing patterns, the delicate antennae, the way the wings overlap and create depth… it might feel overwhelming. You might be wondering, “How do you draw something that looks so complex and detailed?”
The amazing secret I’m going to share with you is that even the most beautiful, seemingly complicated butterfly can be broken down into just three simple shapes: triangles, rectangles, and circles! That’s it! With this magical combination of basic shapes, you’ll be creating stunning butterflies that capture all the wonder and beauty of those garden visitors.
In this step-by-step tutorial, I’ll guide you through transforming these simple geometric forms into a gorgeous butterfly that’s perfect for beginners yet sophisticated enough to make you proud. Whether you want to recreate memories of your own butterfly encounters or simply bring some natural beauty into your art, this tutorial will give you all the tools you need.
Table of Contents
What You’ll Learn in This Butterfly Drawing Tutorial
- How to simplify complex natural forms using basic geometric shapes
- Step-by-step butterfly anatomy and structure
- Techniques for creating realistic wing layering and overlap
- Professional methods for drawing delicate features like antennae
- Color gradient techniques that make wings come alive
- Adding authentic details that bring your butterfly to life
- How to create depth and dimension in flat drawings
- Customization options for different butterfly species and styles
The Magic of Butterflies in Art
Butterflies have captivated artists for centuries because they represent:
- Transformation and growth – perfect symbols for artistic development
- Natural beauty – gorgeous subjects for practicing color and pattern
- Delicate grace – excellent for learning to draw gentle, flowing lines
- Symmetry – great practice for balanced composition
- Detail work – wonderful for developing observational skills
Learning to draw butterflies also teaches fundamental skills that transfer to many other subjects: wing mechanics for birds, pattern work for textiles, and organic shape construction for all kinds of natural forms.
Materials You’ll Need for Your Butterfly
For Digital Drawing:
- Drawing tablet (iPad with Apple Pencil or similar)
- Procreate, Adobe Fresco, or your preferred drawing app
- Fine-tip brush for detailed line work
- Soft airbrush for gradient effects
For Traditional Drawing:
- Pencils (2H for light sketching, 2B for final details)
- Fine-tip black markers or pens
- Colored pencils, markers, or watercolors in these colors:
- Dark blue or gray (body)
- Your choice of wing colors (I’ll use blue as an example)
- Lighter versions of your wing colors
- White (for highlights and details)
- Good eraser for clean corrections
- Optional: blending tools for smooth color transitions
The beauty of butterfly drawing is that it works wonderfully with any art supplies – from basic school materials to professional equipment!
Understanding Butterfly Anatomy
Before we start drawing, let’s understand what makes a butterfly a butterfly:
- Body (thorax and abdomen): The central structure that everything connects to
- Head: Contains the eyes and feeding apparatus
- Antennae: Sensory organs with distinctive club-shaped ends
- Forewings: The larger, front wings
- Hindwings: The smaller, back wings that are partially hidden
- Wing patterns: Nature’s artwork that varies by species
Understanding this basic anatomy helps us draw butterflies that look authentic and believable!
Step-by-Step Guide: How to Draw a Beautiful Butterfly
Step 1: Master the Three Foundation Shapes
The secret to drawing any butterfly lies in recognizing that these complex creatures are built from just three simple shapes:
- Rectangles for the body structure
- Triangles for the wing foundation
- Circles for the head and rounded details
Once you see butterflies this way, they become much less intimidating and much more achievable!
Step 2: Create the Butterfly Body
Drawing the main body:
- Start with a rounded rectangle for the main body (thorax and abdomen)
- Make it vertically oriented, like a elongated oval with soft corners
- This will be the central anchor point for everything else
Adding the tail section:
- Draw a small, pointed tail connected to the bottom of your rectangle
- This represents the tip of the butterfly’s abdomen
- Keep it subtle and proportional to the main body
Step 3: Add the Head and Antennae
Creating the head:
- Draw a circle at the top of your body rectangle
- Make it smaller than the body width – about 1/3 the size
- Position it so it sits naturally on top of the body
Drawing the antennae:
- From the top of the head, draw two long, thin lines extending upward and slightly outward
- These should be roughly the same length as the body
- At the end of each antenna, add a small rounded tip (this is the distinctive “club” shape)
- The antennae should curve gently, not be perfectly straight
Step 4: Construct the Wing Foundation
This is where our triangle foundation really shines!
Drawing the forewings (front wings):
- Use triangular shapes as your base, but soften and round the edges
- Start from the side of the body and draw flowing, organic triangular forms
- Make them fairly large – forewings are typically the most prominent feature
- Keep them soft and curved rather than sharp and geometric
Adding the hindwings (back wings):
- Draw the lower part of each wing connected from the bottom section of the body
- These are smaller than the forewings and positioned behind them
- Since the front wings cover part of the back wings, you’ll only draw curves to suggest the hidden portions
Creating realistic overlap:
- Remember that the front wing naturally covers part of the back wing
- Draw curved lines to show where the back wing continues behind the front wing
- This layering effect instantly makes your butterfly look three-dimensional
Step 5: Add Authentic Body Details
Body segmentation:
- Draw a few horizontal lines across the lower half of the body
- These represent the natural segments of the butterfly’s abdomen
- Keep them subtle – just simple lines that break up the solid shape
Adding legs:
- Draw two small legs on the upper half of the body
- Butterflies have six legs total, but in this side view, we typically only see about two clearly
- Keep them simple – just small lines or tiny shapes
Step 6: Create Beautiful Wing Patterns
This is where your butterfly really comes to life with authentic details!
Inner wing structures:
- Draw smaller wing shapes inside your larger wing outlines
- These represent the natural pattern divisions found on real butterfly wings
- Follow the same general shape as your outer wings but make them smaller
Wing tip details:
- Add gentle curves toward the ends of the wings
- These curved lines suggest the natural flow and structure of wing membranes
- Connect some of these curves to your inner wing shapes
Pattern lines:
- Add a few subtle lines here and there to suggest wing veining
- Keep these delicate and minimal – too many lines can overwhelm the drawing
- Focus on the most prominent pattern elements
Step 7: Clean Up Your Line Art
Final refinements:
- Erase any construction lines that are no longer needed
- Clean up any rough or overlapping areas
- Ensure all your curves are smooth and flowing
- Check that the overall proportions look balanced
Take your time with this step – clean, confident lines make a huge difference in the final appearance!
Bringing Your Butterfly to Life with Color
Coloring your butterfly is where you can really let your creativity soar! The color possibilities are endless, just like in nature.
Starting with the Body
Body coloring:
- Use dark blue or gray for the main body
- This creates a nice contrast with most wing colors
- Keep the body color fairly neutral so it doesn’t compete with the wings
Choosing Your Wing Colors
Color inspiration: Since butterfly wings come in virtually every color imaginable, you can choose any combination that speaks to you:
- Classic blue (like my example) for peaceful, calming vibes
- Monarch orange and black for iconic recognition
- Purple and pink for magical, fantasy appeal
- Yellow and black for cheerful, sunny energy
- Green and brown for natural, earthy beauty
- Multiple colors for rainbow butterfly magic!
Creating Professional Color Gradients
The outer edge technique:
- Start by coloring the outer parts of the wings with a darker version of your chosen color
- This creates natural shading and depth
- Use steady, confident strokes following the wing’s natural curves
Inner wing brightness:
- Fill the inner parts of the wings with a brighter, lighter version of your color
- This contrast between dark outer edges and bright centers is very realistic
Gradient blending:
- To create a beautiful gradient effect, lightly color the transition areas with a medium tone
- Use light pressure and blend where the dark and light areas meet
- This smooth transition makes your wings look professional and dimensional
Adding Final Details
Body shadows:
- Add subtle shadows on the body using a darker version of your body color
- Focus on areas where wings might cast shadows or where the body has natural depth
Wing highlights:
- Add small white specks or highlights at the wing tips
- These tiny details make wings look glossy and catch light naturally
- Don’t overdo it – a few strategic white touches go a long way
Final touches:
- Step back and assess your butterfly
- Add any final small details that would enhance the overall effect
- Remember that sometimes less is more!
Color Variations and Species Inspiration
Monarch Butterfly:
- Orange base with black edges and white spots
- Classic and instantly recognizable
Blue Morpho:
- Electric blue with darker blue edges
- Absolutely stunning and magical
Swallowtail:
- Yellow with black patterns and distinctive tail extensions
- Elegant and sophisticated
Peacock Butterfly:
- Rich browns with eye-spot patterns
- Complex but beautiful
Fantasy Butterflies:
- Rainbow gradients
- Metallic colors
- Pastel dream combinations
- Galaxy or space themes
Advanced Techniques for Butterfly Mastery
Adding texture:
- Use cross-hatching or stippling for wing texture
- Create subtle patterns within the wing areas
- Experiment with different brush textures digitally
Environmental interaction:
- Draw your butterfly near flowers
- Add motion lines to suggest fluttering
- Create multiple butterflies for garden scenes
Seasonal themes:
- Spring butterflies with pastel colors
- Summer butterflies with bold, bright hues
- Autumn butterflies with warm, earthy tones
- Winter butterflies with cool, silvery effects
Troubleshooting Common Issues
Problem: My wings look flat and lifeless
Solution: Make sure you’re using the dark-to-light gradient technique and adding that crucial wing overlap effect.
Problem: The proportions don’t look right
Solution: Check that your head is about 1/3 the width of the body, and that forewings are larger than hindwings.
Problem: The antennae look wrong
Solution: Remember the club-shaped tips! They should be thin lines with rounded ends, not straight throughout.
Problem: My butterfly looks too geometric
Solution: Soften all your edges. Real butterfly wings are organic and flowing, not angular.
Problem: The colors look muddy
Solution: Use clean, distinct colors and maintain good contrast between light and dark areas.
The Science Behind Butterfly Beauty
Understanding a bit about real butterflies can enhance your art:
- Wing scales: Butterfly wings are covered in tiny scales that create their colors
- Iridescence: Some butterflies have wings that change color in different light
- Patterns: Wing patterns often serve purposes like camouflage or mate attraction
- Symmetry: Butterfly wings are nearly perfectly symmetrical
- Flight mechanics: The way wings overlap affects how butterflies fly
This knowledge can inspire more authentic and interesting artistic choices!
Frequently Asked Questions
Q: Can I draw butterflies from different angles?
A: Absolutely! Once you understand the basic structure, you can rotate the angle. Try front view (fully symmetrical) or three-quarter view for variety.
Q: How do I make my butterfly look like it’s flying?
A: Tilt the wings at different angles, add motion lines, and consider positioning the body at a slight diagonal rather than perfectly vertical.
Q: What if I want to add more complex patterns?
A: Start with the basic structure from this tutorial, then gradually add more detailed patterns. Study photos of real butterflies for inspiration.
Q: Can children do this tutorial?
A: Yes! The basic shape approach makes it very accessible. Children might simplify some details, but they can definitely create beautiful butterflies.
Q: How do I choose colors if I want it to look realistic?
A: Research real butterfly species in your area or look up popular types like Monarchs, Swallowtails, or Blue Morphos for authentic color schemes.
Take Your Butterfly Art Further
Now that you’ve mastered basic butterfly drawing, explore these related tutorials:
- How to draw a Succulent
https://drawcartoonstyle.com/how-to-draw-a-succulent/ - How to draw a Kawaii Bee
https://drawcartoonstyle.com/how-to-draw-a-kawaii-cute-bee/ - How to draw a Hand Holding a Rose
https://drawcartoonstyle.com/how-to-draw-a-hand-holding-a-rose/
Share Your Beautiful Butterfly!
I’d love to see your butterfly creations! What colors did you choose for your wings? Did this tutorial remind you of any butterflies you’ve seen in your own garden or local parks?
There’s something truly magical about transforming simple triangles, rectangles, and circles into a beautiful butterfly. Your drawing captures not just the visual beauty of these amazing creatures, but also that sense of wonder and transformation they represent.
Every butterfly starts as a caterpillar, goes through an incredible metamorphosis, and emerges as something completely beautiful and new. In a way, that’s exactly what happens when we learn to draw – we start with basic shapes and simple techniques, practice and develop our skills, and emerge as artists capable of creating beauty!
More Natural Wonder Drawing Adventures
If you enjoyed learning how to draw this beautiful butterfly, visit DrawCartoonstyle.com for more simple animal drawing tutorials that celebrate the incredible diversity and beauty of the natural world. From garden creatures to wild animals, there’s always something new and wonderful to discover through art!
Happy drawing, and may your art take flight! 🦋✨
This post includes affiliate links. If you choose to purchase something, I may make a small commission at no extra cost to you. For more information, please read my Privacy Policy.
Leave a Comment