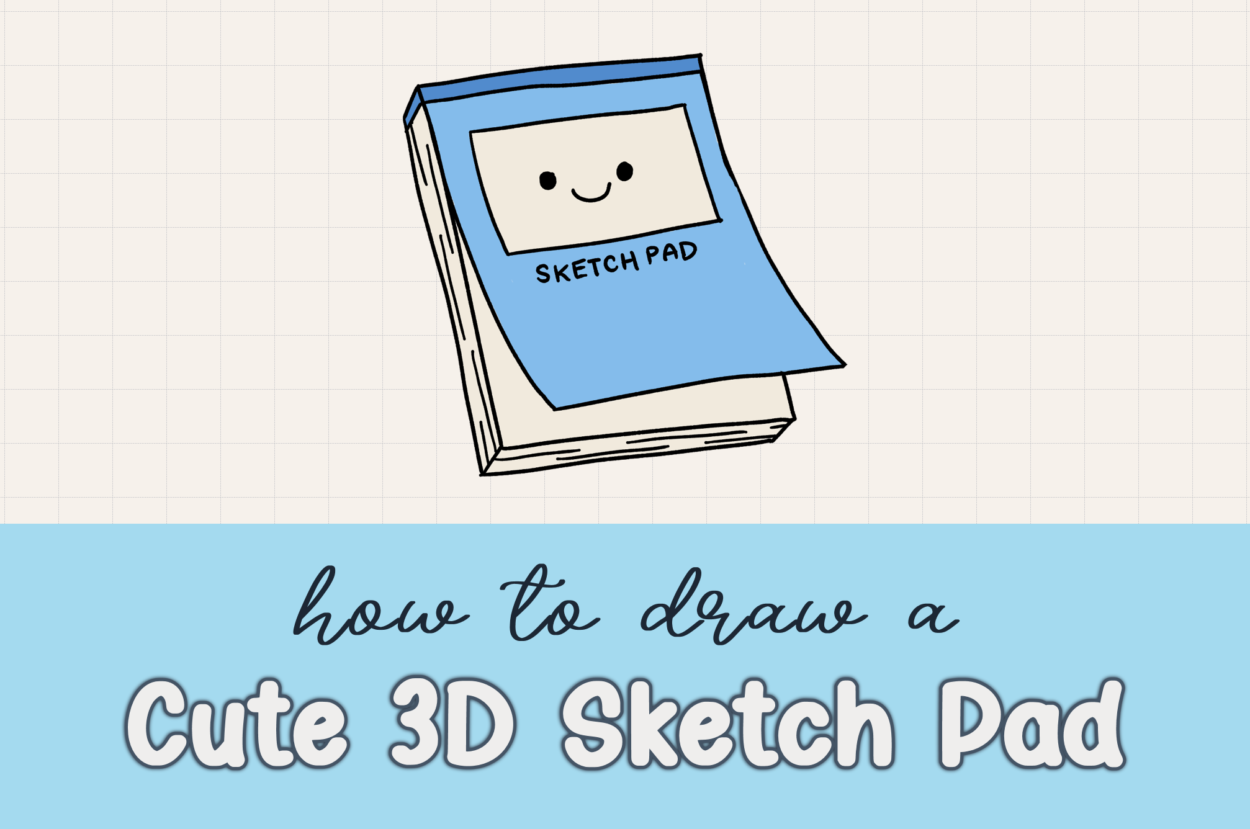
Drawing a sketch pad might seem simple, but learning how to draw a cute 3D sketch pad with personality and depth is one of my favorite beginner-friendly tutorials! There’s something so nostalgic and inspiring about sketch pads – they represent the beginning of every artist’s journey and hold countless creative possibilities.
I remember when I first started drawing, I went from scribbling at the backs of my notebooks to filling whole sketch pads with all of my doodles and story ideas. Whenever I see a sketch pad, it reminds me of those early drawing days and why I fell in love with art in the first place. That nostalgic feeling inspired me to create this adorable 3D sketch pad tutorial that you can draw along with me!
In this step-by-step drawing tutorial, I’ll teach you how to draw a cute sketch pad that looks three-dimensional and full of character. This is perfect for beginners who want to learn basic 3D drawing techniques while creating something absolutely adorable.
What You’ll Learn in This Draw Along Tutorial
- How to break down complex drawings into simple shapes
- Easy techniques to create 3D depth and dimension
- Step-by-step guide to drawing a cute sketch pad with personality
- Coloring tips to bring your sketch pad to life
- How to add kawaii-style facial features to everyday objects
Materials You’ll Need
Before we start drawing our cute sketch pad together, gather these materials:
For Digital Drawing:
- iPad with Apple Pencil (or any drawing tablet)
- Procreate app (or Photoshop, Adobe Fresco)
- Basic brush for outlining
For Traditional Drawing:
- Pencil for sketching
- Fine-tip black marker or pen for outlining
- Colored pencils, markers, or crayons for coloring
- Eraser
- Paper
Remember, you can use absolutely any drawing tools you have available! The technique remains the same whether you’re drawing digitally or traditionally.
Step-by-Step Guide: How to Draw a Cute 3D Sketch Pad
Step 1: Start with a Simple Rectangle Shape
The secret to drawing anything is breaking it down into simple shapes first. For our cute sketch pad, we’ll start with a rectangle as our foundation.
Draw a rectangle that’s slightly tilted to the side. Don’t worry about making it perfect – the slight tilt will actually make our sketch pad look more dynamic and interesting! This basic rectangle will serve as the front cover of our sketch pad.
Pro Tip: If you’re using pencils, draw this initial rectangle lightly so you can easily erase and adjust as needed.
Step 2: Add 3D Depth with Simple Lines
Here’s where the magic happens! We’re going to transform our flat rectangle into a three-dimensional sketch pad using just a few simple lines.
Add lines on the left and bottom sides of your rectangle. These lines should be parallel to the original rectangle edges but slightly offset. This creates the illusion that we’re looking at a thick book from a slight angle.
The left side line shows the thickness of the sketch pad, while the bottom line gives us that 3D perspective. This is a fundamental technique you can use to make any flat shape look three-dimensional!
Step 3: Draw the Binder
Now let’s add the iconic spiral binder that makes a sketch pad instantly recognizable.
Draw two parallel lines across the top of your rectangle. These represent the metal or plastic binding that holds all the pages together.
Step 4: Create the Spiral Binding Detail
To make our binder look realistic and cute, we’ll add the spiral binding loops.
Draw a curved line from the top of the binder extending outwards. Then make a straight line downward, and close it with another curved line going back to the binder. This creates one loop of the spiral binding.
Repeat this process to create several loops along the binder. Don’t worry about making them perfectly uniform – slight variations will make your drawing look more natural and handmade!
Important: Erase any intersecting lines in the middle where the spiral loops overlap with the binder.
Step 5: Add Multiple Pages Detail
Real sketch pads have lots of pages, so let’s show that in our drawing!
Draw some short horizontal lines on the left side of the sketch pad (the 3D side we created earlier). These lines represent the edges of multiple pages stacked together. Vary the spacing slightly to make it look more realistic.
Step 6: Design the Front Cover
Now for the fun part – let’s design the front cover of our sketch pad!
Draw a small rectangle in the center of the front page. This will be like a label or design element on the cover.
Underneath this rectangle, write “SKETCH PAD” in simple, clear letters. You can also write “DRAWING” or “ART” if you prefer!
Step 7: Add a Cute Face (The Kawaii Touch!)
This is what transforms our ordinary sketch pad into an absolutely adorable character!
Inside the small rectangle you drew, add a cute little face:
- Two small dots or circles for eyes
- A tiny curved line for the mouth (smiling, of course!)
- Optional: small curved lines above the eyes for a sleepy or content expression
This kawaii-style face gives our sketch pad personality and makes it incredibly endearing.
How to Color Your Cute Sketch Pad
Coloring brings our sketch pad to life! Here’s my recommended color scheme, but feel free to choose your own colors.
Recommended Color Palette:
- Dark blue for the spiral binder
- Light blue for the front cover
- White for the pages and the face rectangle
Step-by-Step Coloring:
- Color the binder with a dark blue. This makes it stand out and look like real metal or plastic binding.
- Fill the front cover with a lighter blue color. This creates a nice contrast with the dark binder and gives the sketch pad a calming, creative vibe.
- Color the pages and rectangle with white or leave them uncolored if you’re using white paper.
- Optional details: Add subtle shadows on the 3D sides using a slightly darker shade of your main color.
Color Variation Ideas
Don’t feel limited to blue! Here are some other adorable color combinations you can try:
- Pink and white for a cute, feminine look
- Yellow and orange for a sunny, cheerful vibe
- Purple and lavender for a dreamy aesthetic
- Green and mint for a natural, calming feel
- Classic black and white for a timeless look
Troubleshooting Common Drawing Issues
Problem: My 3D lines don’t look right
Solution: Make sure your side lines are parallel to the original rectangle edges and keep them consistent in length.
Problem: The spiral binding looks confusing
Solution: Draw each loop separately and erase overlapping lines carefully. Take your time with this step!
Problem: The proportions look off
Solution: Start with a bigger rectangle if your sketch pad looks too cramped. Remember, you can always adjust the size of details.
Why This Tutorial Works So Well for Beginners
Learning how to draw a cute 3D sketch pad is perfect for beginners because it teaches several fundamental drawing skills:
- Shape simplification: Breaking complex objects into basic shapes
- 3D perspective: Understanding how to add depth to flat drawings
- Detail addition: Learning when and how to add personality to drawings
- Color theory: Exploring how colors affect mood and appeal
Plus, there’s something so motivating about drawing the very tool that represents creativity and artistic growth!
What to Draw in Your Cute Sketch Pad
Now that you’ve drawn your adorable sketch pad, what would you fill it with? Here are some ideas:
- Tiny doodles and kawaii characters
- Practice drawings of your favorite things
- Story ideas and comic strips
- More cute everyday objects
- Inspirational quotes about creativity
Frequently Asked Questions
Q: Can I make my sketch pad bigger or smaller?
A: Absolutely! Start with a larger or smaller rectangle to adjust the overall size. Just keep the proportions consistent.
Q: What if I mess up the 3D lines?
A: Don’t worry! You can erase and redraw them. The beauty of this tutorial is that slight imperfections actually make it look more charming.
Q: Can I add more details to my sketch pad?
A: Yes! You could add stickers, more text, or even draw some sketches “peeking out” from the pages.
Q: Is this suitable for kids to draw?
A: Definitely! This tutorial is designed to be beginner-friendly and perfect for young artists learning basic 3D drawing concepts.
Take Your Drawing Further
Once you’ve mastered this cute sketch pad, try these related tutorials:
- How to draw a Hand Holding a Pencil https://drawcartoonstyle.com/how-to-draw-hand-holding-pencil/
- How to draw a Cardboard Box https://drawcartoonstyle.com/how-to-draw-a-cute-cardboard-box/
- How to draw a Cute Suitcase
https://drawcartoonstyle.com/how-to-draw-a-cute-suitcase/ - How to draw a Cute Kawaii Coffee Cup
https://drawcartoonstyle.com/how-to-draw-kawaii-coffee-cup/
Share Your Sketch Pad Drawing!
I’d love to see your cute sketch pad drawings! What colors did you choose? Did you add any special details or modifications?
Remember, every artist started somewhere, and sketch pads represent the beginning of countless creative journeys. There’s something so special about drawing the very object that holds our artistic dreams and ideas.
Keep practicing, keep creating, and most importantly, have fun with your art! Your sketch pad drawing is just the beginning of your artistic adventure.
More Draw Along Tutorials
If you enjoyed learning how to draw this cute 3D sketch pad, you’ll love our other draw along tutorials! Check out our complete collection of beginner-friendly drawing guides, from kawaii characters to everyday objects transformed into adorable art.
Visit DrawCartoonstyle.com for more simple and easy drawing tutorials that will inspire your creativity and help you grow as an artist.
Happy drawing! 🎨✏️
This post includes affiliate links. If you choose to purchase something, I may make a small commission at no extra cost to you. For more information, please read my Privacy Policy.
Leave a Comment