I saw my cat curled up sleeping one day, and just looking at her made me feel incredibly relaxed and calm. There’s something so magical about watching our pets rest so peacefully – the way they curl up into perfect little balls, completely content and safe in their cozy spots. Seeing our furry friends in such a tranquil state can remind us that we also need to take breaks, slow down, and find moments of peace in our busy lives.
That beautiful, serene moment inspired me to create this gentle drawing tutorial. There’s something therapeutic about both watching a sleeping cat and drawing one – both activities encourage us to slow down, breathe deeply, and appreciate simple moments of contentment.
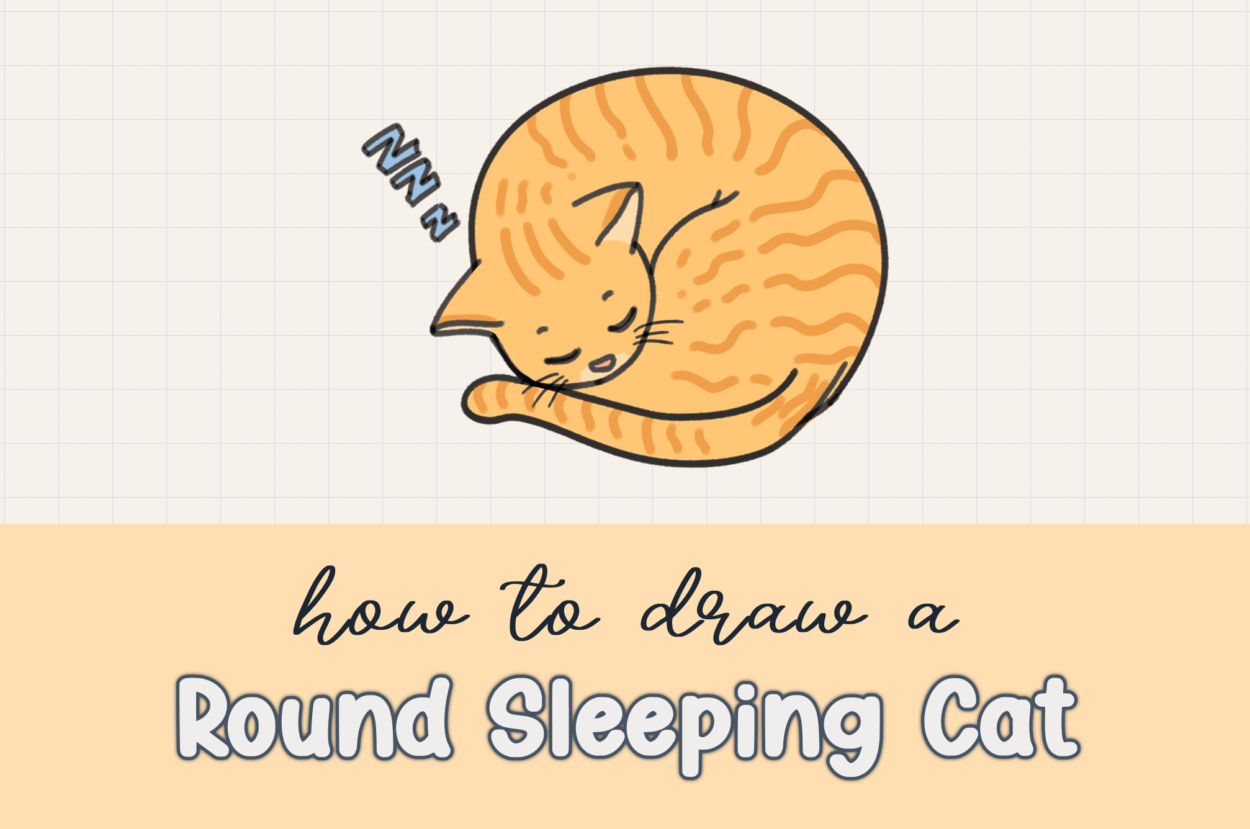
In this relaxing draw-along session, I’ll guide you through creating your very own round sleeping cat that captures all the peaceful energy of a kitty lost in dreamland. We’ll use simple shapes and gentle techniques that make this tutorial perfect for unwinding after a long day or starting your morning with something calming and creative.
Table of Contents
What You’ll Learn in This Peaceful Drawing Tutorial
- How to use simple circles to create complex, curled-up poses
- Techniques for drawing peaceful, sleeping expressions
- Step-by-step methods for showing relaxed body positions
- Adding symbolic elements (like “Z”s) to enhance storytelling
- Color techniques for creating realistic tabby cat patterns
- How to convey calm, restful emotions through art
- Drawing whiskers and facial details that suggest contentment
The Art of Drawing Peaceful Moments
Learning to draw sleeping animals teaches us valuable skills beyond just technique. It encourages us to:
- Observe quiet moments and find beauty in stillness
- Practice patience as we capture serene poses
- Create calming art that soothes both artist and viewer
- Appreciate rest and self-care through artistic expression
- Connect with our pets on a deeper emotional level
Plus, sleeping cat drawings are perfect for greeting cards, relaxation journals, bedroom decorations, or anywhere you want to add a touch of peaceful energy!
Materials You’ll Need for Your Sleeping Cat
For Digital Drawing:
- Drawing tablet (iPad with Apple Pencil or similar)
- Procreate, Adobe Fresco, or your favorite drawing app
- Soft round brush for gentle lines
- Airbrush tool for smooth color blending
For Traditional Drawing:
- Pencils (2H for light sketching, 2B for final lines)
- Fine-tip markers or pens in black
- Colored pencils, markers, or crayons in these colors:
- Orange (main tabby color)
- Light orange (inner ears, snout)
- Dark orange (tabby stripes)
- Pink (nose)
- Blue (or any color for the “Z”s)
- Good eraser for gentle cleanup
- Optional: blending stumps for soft color transitions
The gentle nature of this tutorial makes it perfect for any art supplies – even basic materials will create beautiful, calming results!
Understanding Cat Sleep Positions
Before we draw, let’s appreciate how cats actually sleep. Cats are masters of comfort and relaxation, often sleeping 12-16 hours per day! When they curl up in a ball:
- They conserve body heat by tucking paws and tail close
- They feel secure with vital organs protected
- They can spring into action quickly if needed
- They create the perfect circle – nature’s most efficient shape!
This natural curled position is what makes our “round sleeping cat” so authentic and appealing.
Step-by-Step Guide: How to Draw a Round Sleeping Cat
Step 1: Start with the Perfect Circle Foundation
The beauty of drawing a sleeping cat lies in its simplicity. When cats curl up to sleep, they naturally form an almost perfect circle – which makes our drawing foundation incredibly straightforward!
Drawing the body circle:
- Draw a large, comfortable circle for the main body
- Don’t worry about making it absolutely perfect – slight irregularities add natural charm
- This circle will contain almost everything: the body, legs, and most of the tail
- Make it big enough to comfortably fit all our cat details
This single circle is the foundation for our entire peaceful scene!
Step 2: Create the Cat’s Sleeping Head
Now we’ll add the head, which in a curled-up position nestles perfectly against the body.
Drawing the head shape:
- On the middle-left side of your circle, draw a large “U” shape
- This “U” represents the cat’s head resting against its body
- The opening of the “U” should face toward the center of the circle
- Size it proportionally – about 1/3 the width of your main circle
Adding the ears:
- Draw a triangle at each end of your “U” shape
- These triangles represent the cat’s ears, relaxed and slightly folded
- Add a simple line down the middle of each ear for dimension
- Keep them soft and relaxed-looking, not alert or perked up
Step 3: Draw the Peaceful Sleeping Expression
The facial expression is what transforms our basic shapes into a truly peaceful sleeping cat.
Creating sleeping eyes:
- At the middle of the face area, draw two gentle curves pointing downward
- These represent closed, relaxed eyelids
- Make them soft and content-looking, not tightly squeezed shut
Adding facial features:
- Draw a small button nose (just a tiny oval or triangle)
- Add two small lines above the eyes to create little eyebrows
- These subtle details suggest deep, peaceful sleep
The key is keeping everything soft and relaxed – no sharp angles or tense lines!
Step 4: Add the Curled-Up Body Position
Now we’ll show how the cat has tucked its legs and positioned itself for maximum comfort.
Drawing the legs:
- In the middle of the cat’s body circle, draw a “Y” shape with a long tail extending from it
- This represents the cat’s front legs tucked underneath its body
- The “Y” suggests the way front paws are often positioned when cats curl up
Creating the tail:
- Draw a squiggly, curved line that wraps partway around the body
- The tail should look like it’s curled around for warmth and comfort
- Make it flow naturally, following the circular shape of the body
Clean up intersecting lines:
- Carefully erase any lines that intersect from the inside of your cat
- This creates the illusion that body parts are properly layered
- Take your time with this step – clean lines make a big difference!
Step 5: Add the Classic Sleep Symbols
No sleeping drawing is complete without the universal symbol of peaceful slumber!
Drawing the “Z”s:
- Add several small “Z” shapes floating above the cat’s head
- Vary their sizes – some bigger, some smaller
- Position them at different heights for a natural floating effect
- These instantly communicate that your cat is deeply asleep
You can make the “Z”s playful and whimsical – they’re a fun cartoon element that adds personality!
Step 6: Finish with Whiskers and Details
Adding whiskers:
- Draw several thin, curved lines extending from the cheek area
- Make them gentle and slightly droopy, suggesting relaxation
- Vary the lengths for a natural look
- About 3-4 whiskers on the visible side is perfect
Step 7: Bring Your Sleeping Cat to Life with Color
Coloring your sleeping cat is a meditative process that adds warmth and personality to your peaceful scene.
Creating a Beautiful Orange Tabby
Base color:
- Fill the entire body, head, and tail with a warm orange color
- This creates the foundation for our tabby cat pattern
- Use smooth, even strokes for a soft appearance
Adding lighter accents:
- Color the inside of the ears with light orange
- Add light orange to the tip of the snout area
- These lighter areas add dimension and realism
Creating Realistic Tabby Patterns
Adding tabby stripes:
- Use dark orange to add curved lines on the head
- Draw stripes along the body following the natural curve
- Add some darker orange at the tips of the ears
- Keep stripes flowing and organic – real cat markings aren’t perfectly geometric
Pattern placement tips:
- Follow the natural curves of your cat’s body
- Make stripes wider on larger areas, thinner on smaller areas
- Leave some areas without stripes for visual balance
Final Colorful Touches
The adorable nose:
- Color the button nose with soft pink
- This adds a touch of warmth and cuteness
- Keep it small and delicate
Colorful sleep symbols:
- Fill in the “Z”s with any color you love
- Blue creates a dreamy, peaceful feeling
- Purple suggests magical dreams
- Rainbow colors add whimsical fun
- Choose colors that make you feel calm and happy!
Color Variations to Try
While orange tabby is classic and beautiful, consider these peaceful alternatives:
Calming color palettes:
- Gray tabby with white accents for sophisticated elegance
- Cream and tan for gentle, soothing vibes
- Black with white patches for striking but peaceful contrast
- Soft brown tabby for earthy, grounding energy
- Pastel colors for dreamy, fantasy appeal
Seasonal variations:
- Autumn cat: Deep oranges and browns with falling leaf “Z”s
- Winter cat: Cool blues and grays with snowflake “Z”s
- Spring cat: Soft greens and pinks with flower “Z”s
- Summer cat: Bright, cheerful colors with sun “Z”s
The Therapeutic Benefits of Drawing Sleeping Animals
Creating art of peaceful subjects like sleeping cats offers wonderful mental health benefits:
- Stress reduction through focusing on calm imagery
- Mindfulness practice as you observe and recreate peaceful poses
- Emotional regulation by engaging with soothing content
- Self-care reminder to prioritize rest and relaxation
- Connection with nature and the animals we love
Many artists find that drawing sleeping subjects naturally slows their breathing and heart rate, creating a meditative state similar to the peaceful animals they’re drawing.
Troubleshooting Common Issues
Problem: My cat doesn’t look curled up enough
Solution: Make sure the head “U” shape fits snugly against the body circle, and ensure the tail curves around naturally.
Problem: The sleeping expression looks uncomfortable
Solution: Check that the closed eyes are gentle curves (not tight lines) and that all facial features look soft and relaxed.
Problem: The proportions seem off
Solution: The head should be about 1/3 the width of the body circle. If it’s too big or small, adjust accordingly.
Problem: The tabby stripes look too rigid
Solution: Follow the natural curves of the cat’s body and vary the stripe thickness. Real cat markings are organic and flowing.
Problem: The “Z”s look out of place
Solution: Make sure they’re floating above the head (not touching) and vary their sizes and positions for a natural effect.
Creative Variations and Extensions
Once you’ve mastered the basic sleeping cat, try these peaceful variations:
Different sleeping positions:
- Cat stretched out on its side
- Cat curled up in a basket or bed
- Cat sleeping on a windowsill
- Multiple cats sleeping together
Environmental additions:
- Cozy blanket or pillow
- Sunny window with curtains
- Fireplace or cozy corner
- Garden setting with flowers
Seasonal themes:
- Winter cat by a fireplace
- Summer cat in a garden
- Autumn cat among fallen leaves
- Spring cat with blooming flowers
Interactive elements:
- Thought bubbles showing cat dreams
- Gentle rain outside while cat sleeps inside
- Other pets sleeping nearby
- Books or toys scattered around
Frequently Asked Questions
Q: Can I draw other animals using this same technique?
A: Absolutely! Dogs, rabbits, hamsters, and many other animals also curl up to sleep. Just adjust the ear shapes and facial features.
Q: How do I make my cat look more three-dimensional?
A: Focus on shading the underside of the body and adding subtle shadows where body parts overlap. Soft gradients work better than harsh lines.
Q: What if I want to add a background?
A: Keep backgrounds simple and peaceful – soft colors, gentle patterns, or cozy indoor settings work best to maintain the calm mood.
Q: Can I make my sleeping cat larger or smaller?
A: Yes! Just scale the initial circle up or down. All the other proportions will naturally follow.
Q: How do I know if my cat looks peaceful enough?
A: If looking at your drawing makes you feel calm and relaxed, you’ve succeeded! The artwork should evoke the same peaceful feelings as watching a real sleeping cat.
Take Your Peaceful Art Further
Now that you’ve created your tranquil sleeping cat, explore these related tutorials:
- How to draw a Kawaii Cat
https://drawcartoonstyle.com/how-to-draw-a-kawaii-cat/ - How to draw a Cat in the Box
https://drawcartoonstyle.com/how-to-draw-a-cat-in-a-box/ - How to draw a Cat laying down https://drawcartoonstyle.com/how-to-draw-a-cat-lying-down/
- How to draw a Cat in a Cup
https://drawcartoonstyle.com/how-to-draw-a-cat-in-a-cup/
Share Your Sleeping Cat Creation!
I’d love to see your peaceful sleeping cat drawings! What do you think your cat is dreaming about? Do you have a pet that inspired your artwork?
There’s something so special about capturing moments of pure peace and contentment through art. Your sleeping cat drawing is more than just a picture – it’s a reminder to appreciate quiet moments, value rest, and find beauty in the simple act of peaceful sleep.
Every time you look at your finished drawing, let it remind you of the importance of rest, the beauty of peaceful moments, and the joy that our beloved pets bring to our lives.
More Peaceful Drawing Adventures
If you enjoyed this calming sleeping cat tutorial, visit DrawCartoonstyle.com for more relaxing drawing tutorials that celebrate the quiet, beautiful moments in life. Sometimes the most meaningful art comes from the simplest, most peaceful subjects.
Sweet dreams and happy drawing! 😴🐱💤
This post includes affiliate links. If you choose to purchase something, I may make a small commission at no extra cost to you. For more information, please read my Privacy Policy.
Leave a Comment