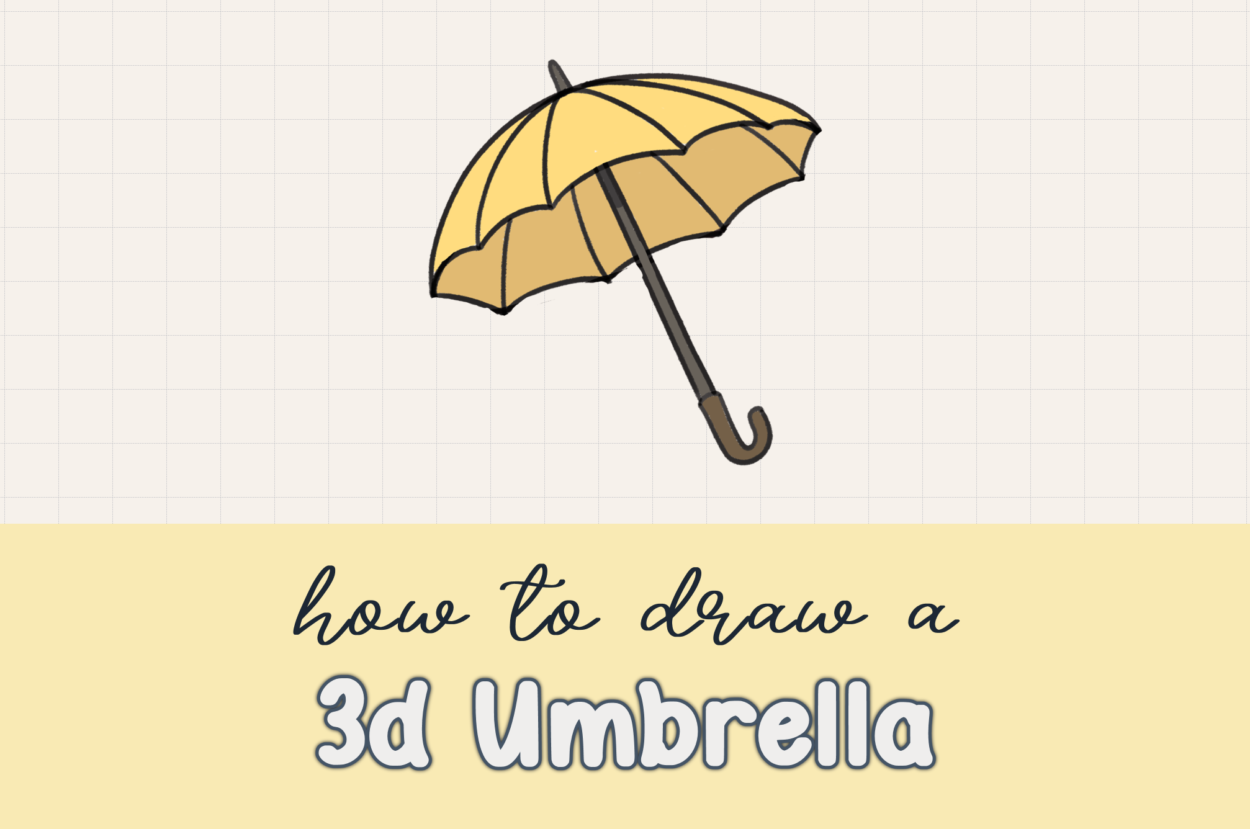
Have you ever wanted to learn how to draw a 3D umbrella that looks realistic and dimensional? The recent rainy weather inspired me to create this step-by-step tutorial that will completely transform how you approach umbrella drawings! Instead of drawing a flat, simple umbrella, I’m going to show you how to level up your drawing skills and create a stunning three-dimensional umbrella that jumps off the page.
Drawing in 3D might sound intimidating, but I promise this tutorial breaks everything down into simple, manageable steps that any beginner can follow. By the end of this draw-along session, you’ll understand fundamental 3D drawing principles that you can apply to countless other objects!
There’s something so satisfying about watching a flat drawing transform into something that looks real and dimensional. Whether you’re caught in a rainy day and feeling inspired, or you just want to expand your drawing toolkit, this 3D umbrella tutorial is perfect for artists of all skill levels.
What You’ll Learn in This 3D Drawing Tutorial
- How to visualize 3D objects using basic shapes as foundations
- Essential techniques for creating depth and dimension in your drawings
- Step-by-step process for drawing a realistic umbrella structure
- Professional shading and coloring methods to enhance the 3D effect
- How to use color values to simulate natural lighting and shadows
- Clean line art techniques that make your drawings look polished
Why Learn to Draw a 3D Umbrella?
Learning how to draw a 3D umbrella teaches you transferable skills that will improve all your artwork:
- Perspective drawing fundamentals that apply to any object
- Shape simplification techniques for breaking down complex forms
- Light and shadow understanding essential for realistic art
- Structural drawing skills that help with architectural and mechanical subjects
Plus, umbrellas are such versatile subjects – you can use this skill to draw rainy day scenes, fashion illustrations, or even whimsical characters holding colorful umbrellas!
Materials You’ll Need
For Digital Drawing:
- Drawing tablet (iPad Pro with Apple Pencil recommended)
- Procreate, Adobe Fresco, or Photoshop
- Basic round brush for outlining
- Soft brush for shading
For Traditional Drawing:
- Pencils (2H for light sketching, 2B for darker lines)
- Fine-tip black pen or marker for final lines
- Colored pencils, markers, or watercolors
- Good eraser (kneaded eraser works great)
- Blending stump (optional, for smooth shading)
Remember, the technique works with any materials you have available – from basic pencil and paper to professional digital tools!
Step-by-Step Guide: How to Draw a 3D Umbrella
Step 1: Understand the 3D Foundation
The secret to drawing any 3D object is starting with the right foundational shape. For our umbrella, we need to think of the umbrella head as a long oval with a curve on top – this is what gives us that crucial three-dimensional appearance.
Imagine you’re looking at an umbrella from a slight angle, not directly from above or below. This perspective allows us to see both the top curve and the underside, which creates the 3D effect we’re after.
Start by lightly sketching this elongated oval shape. The curve should be gentle and natural – think of how an umbrella naturally curves when it’s open and protecting you from rain.
Step 2: Add the Umbrella’s Pointed Top
Every umbrella has that distinctive pointed tip at the very top. Draw a small pointed triangle or cone shape at the center of your oval’s top curve.
This pointed part is usually made of metal or plastic and serves both functional and aesthetic purposes. Make it proportional to your umbrella – not too big that it overwhelms the design, but large enough to be clearly visible.
Step 3: Draw the Umbrella Stick (The Shaft)
From the pointed top, draw two long, parallel lines extending downward. These lines represent the umbrella’s main shaft or stick.
The lines should be:
- Parallel and evenly spaced
- Straight and vertical
- Proportional to your umbrella head (usually about 1.5 times the umbrella diameter in length)
This central shaft is what gives structure to the entire umbrella, so take your time to get it right.
Step 4: Create the Handle
At the bottom of your umbrella shaft, draw the handle in a classic “U” or “J” shape. Most umbrellas have curved handles that are comfortable to grip.
You can choose from different handle styles:
- Classic curved handle (most common)
- Straight handle (for a more modern look)
- Hook-shaped handle (traditional style)
For this tutorial, we’ll go with the classic curved handle that forms a gentle “U” shape.
Step 5: Clean Up the Initial Structure
Now it’s time to erase some construction lines to make our drawing cleaner:
- Erase the front part of the shaft lines where they would be hidden by the umbrella head
- Remove the intersecting line in the middle of the stick where it meets the umbrella head
This step is crucial for creating the illusion that the umbrella head is actually sitting on top of the shaft, rather than the shaft going through it.
Step 6: Draw the Umbrella’s Bell Shape (The Curves)
This is where our flat drawing really starts to look three-dimensional! We’re going to add the characteristic curves that show the umbrella’s bell-like shape.
For the front section:
- Draw gentle curves under the front part of your oval
- These curves should follow the natural drape of umbrella fabric
- Make them slightly uneven – real umbrellas aren’t perfectly symmetrical
For the back section:
- Add similar curves to the bottom of the back part
- These should be slightly less pronounced since they’re further away
The key is to imagine how an umbrella naturally hangs when it’s open – the fabric creates gentle scalloped edges between the supporting ribs.
Step 7: Add the Umbrella Ribs (Support Lines)
Real umbrellas have metal ribs that support the fabric, and adding these lines will make our drawing look much more authentic.
Draw lines that connect from the end of each curve to the top pointed part of the umbrella. To make this easier:
- Trace the motion from the top point to each curve ending
- Draw continuous lines that don’t intersect unnecessarily
- Vary the spacing slightly for a more natural look
Pro tip: You can draw these lines without creating intersections that you’ll need to erase later by being mindful of where each line starts and ends.
Step 8: Final Line Art Cleanup
Take a moment to clean up your drawing:
- Erase any remaining construction lines
- Darken your final outlines
- Make sure all connections look smooth and natural
- Check that your proportions look balanced
Your line art should now look like a complete, well-structured 3D umbrella!
How to Color Your 3D Umbrella
Coloring is where we really bring the three-dimensional effect to life using light, shadow, and color values.
Step 1: Color the Structural Elements
Start with the umbrella’s framework:
- Pointed top: Use dark gray or black
- Shaft/stick: Use the same dark gray for consistency
- Handle: Brown or dark tan works well for a classic wood look
Step 2: Choose Your Umbrella Color
Now for the fun part – pick any color you love for your umbrella head! Popular choices include:
- Bright yellow for a cheerful, sunny contrast to rainy weather
- Classic red for a bold, traditional look
- Navy blue for sophisticated elegance
- Vibrant purple for creative flair
- Forest green for a natural, calming feel
Fill in the main umbrella head with your chosen color.
Step 3: Add Shadows and Depth
This is the crucial step that transforms your drawing from flat to fully three-dimensional:
Underside shading:
- Use a darker version of your main umbrella color
- Color the underside sections (the curves we drew earlier)
- This simulates the natural shadow created when light hits the top of the umbrella
Shaft shadow:
- Add a shadow on one side of the umbrella stick
- This shows that the underside of the umbrella is casting a shadow
- Use a medium gray that’s darker than your base stick color
Step 4: Final Shading Details
To really make your umbrella pop:
- Add subtle highlights on the top curves where light would hit most directly
- Deepen shadows where umbrella sections overlap
- Consider adding a soft drop shadow beneath the entire umbrella
Advanced Coloring Techniques
Gradient shading: Instead of flat colors, try gradual color transitions from light to dark across each umbrella section.
Reflective highlights: Add small white highlights on the pointed top and handle to suggest metallic or glossy surfaces.
Environmental lighting: Consider where your light source is coming from and shade accordingly – this makes your umbrella look like it exists in a real space.
Common Mistakes and How to Fix Them
Problem: My umbrella looks flat despite following the steps
Solution: Check your shading – the contrast between light and dark areas creates the 3D effect. Make your shadows darker!
Problem: The proportions look off
Solution: The umbrella head should be roughly 2-3 times wider than the shaft thickness, and the shaft should be about 1.5 times the umbrella diameter in length.
Problem: The curves look stiff and unnatural
Solution: Real umbrella fabric drapes softly. Make your curves gentle and slightly irregular – perfection actually looks less realistic!
Problem: The ribs (support lines) look confusing
Solution: Draw them one at a time, ensuring each line goes from the center point to a curve ending. Erase any overlapping segments.
Why This Tutorial Works So Well
Learning to draw a 3D umbrella is incredibly valuable because it teaches you:
- Shape decomposition: Breaking complex objects into manageable basic forms
- Perspective basics: Understanding how 3D objects appear on 2D surfaces
- Light logic: How natural lighting creates shadows and highlights
- Structural thinking: Considering how objects are actually built and supported
These skills transfer directly to drawing buildings, furniture, vehicles, and countless other subjects!
Variations to Try
Once you’ve mastered the basic 3D umbrella, experiment with:
- Beach umbrella: Make it larger with more colorful stripes
- Cocktail umbrella: Draw it tiny and decorative
- Broken umbrella: Show bent ribs and torn fabric for character
- Transparent umbrella: Practice with clear materials and reflections
- Patterned umbrella: Add polka dots, stripes, or floral designs
Frequently Asked Questions
Q: Can I draw this umbrella from different angles?
A: Absolutely! Once you understand the basic structure, you can rotate the angle. Try drawing it from directly above (circular view) or from the side (profile view).
Q: How do I make my umbrella look wet like it’s been in the rain?
A: Add small water droplets on the surface and perhaps a slight shine or reflection to suggest wetness. Darker colors also suggest dampness.
Q: What if my curves don’t look even?
A: That’s actually more realistic! Real umbrellas have slight imperfections. As long as the overall shape reads as an umbrella, small variations add character.
Q: Can I add a person holding the umbrella?
A: Yes! This umbrella can be a great starting point for more complex rainy day scenes. Just consider the scale and hand positioning.
Take Your 3D Drawing Skills Further
Now that you’ve learned how to draw a 3D umbrella, try these related tutorials:
- How to draw a Cute Cardboard Box
https://drawcartoonstyle.com/how-to-draw-a-cute-cardboard-box/ - How to draw a Simple House Plant
https://drawcartoonstyle.com/how-to-draw-a-simple-house-plant/ - How to draw a Strawberry Milk Carton
https://drawcartoonstyle.com/how-to-draw-strawberry-milk-carton/ - How to draw a Lipstick
https://drawcartoonstyle.com/how-to-draw-a-lipstick/
Share Your Umbrella Creation!
I’d love to see your 3D umbrella drawings! What color did you choose for your umbrella? Did you add any special details or patterns?
There’s something so satisfying about transforming a simple, everyday object like an umbrella into a three-dimensional work of art. The skills you’ve learned here – shape simplification, perspective, and shading – are the building blocks for drawing anything in 3D.
Remember, every professional artist started with fundamentals like these. Keep practicing, keep experimenting with different objects, and most importantly, enjoy the process of bringing your drawings to life!
More 3D Drawing Adventures Await
If you enjoyed learning how to draw this 3D umbrella, explore more beginner-friendly tutorials at DrawCartoonstyle.com. From kawaii characters to architectural elements, there’s always something new to learn and create.
Happy drawing, and stay dry! ☔🎨
This post includes affiliate links. If you choose to purchase something, I may make a small commission at no extra cost to you. For more information, please read my Privacy Policy.
Leave a Comment