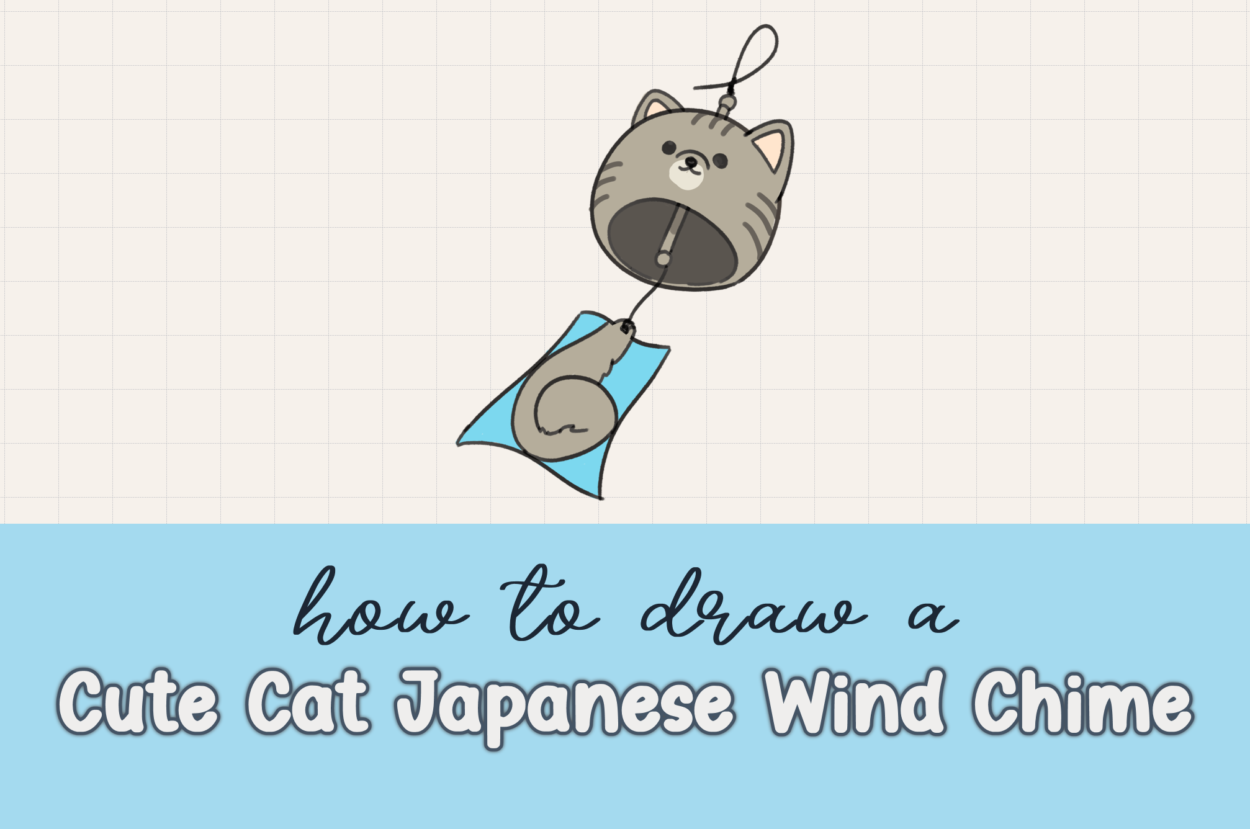
Last Christmas, our family was gifted this beautiful Japanese wind chime that looked exactly like a cute little gray cat! The moment I saw it hanging there, gently chiming in the breeze with its sweet cat face and delicate paper streamer, I knew I had to share this magical drawing idea with you. It made me realize that you can transform almost any animal into an adorable wind chime design – how creative is that?
Japanese wind chimes (called “furin” in Japanese) are so different from the typical wind chimes we usually see. They have this unique, minimalist elegance combined with whimsical charm that makes them perfect subjects for cute character art. The combination of traditional Japanese craftsmanship with adorable animal designs creates something truly special that’s both culturally beautiful and irresistibly cute!
In this step-by-step tutorial, I’ll teach you how to draw your very own cute cat Japanese wind chime, complete with all the authentic details that make these traditional decorations so enchanting. Plus, I’ll show you how to adapt this same design to create other adorable animals like Shiba Inus and foxes – the possibilities are endless!
Table of Contents
What You’ll Learn in This Wind Chime Drawing Tutorial
- How to draw authentic Japanese wind chime structure and components
- Step-by-step techniques for creating cute animal characters within traditional designs
- Understanding the functional elements of wind chimes (bell, clapper, paper streamer)
- Color techniques for creating realistic cat fur patterns and textures
- How to show movement and wind effects in your drawings
- Adapting one basic design to create multiple different animals
- Cultural appreciation through art – learning about Japanese furin traditions
The Beauty of Japanese Wind Chimes (Furin)
Japanese wind chimes aren’t just decorative – they’re deeply rooted in culture and tradition! Originally, they were believed to ward off evil spirits and bring good fortune. The gentle, melodic sounds they create in summer breezes are considered cooling and peaceful, helping people feel more comfortable during hot, humid Japanese summers.
Traditional furin are often made of glass, metal, or ceramic, with a paper or fabric strip called “tanzaku” that catches the wind and creates the chiming motion. By drawing our own cute animal versions, we’re participating in this beautiful cultural tradition while adding our own creative twist!
Materials You’ll Need
For Digital Drawing:
- Drawing tablet (iPad with Apple Pencil or similar)
- Procreate, Adobe Fresco, or your favorite drawing app
- Basic round brush for outlining
- Soft brush for shading and texture effects
For Traditional Drawing:
- Pencils (2H for light sketching, 2B for details)
- Fine-tip black marker or pen for clean lines
- Colored pencils, markers, or watercolors in these colors:
- Light gray (main cat color)
- Dark gray (shadows and stripes)
- Powder pink (inner ears)
- Sky blue (paper streamer)
- White (highlights)
- Good eraser for cleanup
- Optional: blending tools for smooth color transitions
Understanding Japanese Wind Chime Structure
Before we start drawing, let’s understand the key components that make a wind chime work:
- The Bell (Kane): The main hollow vessel that creates the sound
- The Clapper (Zetsu): The small piece inside that strikes the bell
- The Paper Strip (Tanzaku): The decorative paper that catches wind and moves the clapper
- The Hanging Cord: What suspends the entire wind chime
Each element serves both a functional and aesthetic purpose, which we’ll incorporate into our cute cat design!
Step-by-Step Guide: How to Draw a Cute Cat Wind Chime
Step 1: Simplify Into Basic Shapes
Just like all our tutorials, we’ll start by breaking down this seemingly complex object into simple, manageable shapes:
- Circle for the wind chime bell (this will become our cat’s body/head)
- Rectangle for the paper streamer (this will have the cat’s tail design)
These two basic shapes form the foundation of every Japanese wind chime, so getting them right is essential!
Step 2: Draw the Wind Chime Bell Structure
Creating the bell shape:
- Start with a nice, round circle
- This circle represents the main body of the wind chime bell
- Make it large enough to comfortably fit all our cat features
Adding the hollow opening:
- Draw a curved line underneath the circle
- This shows the hollow part of the bell where sound resonates
- The curve should follow the natural shape of the circle above it
This hollow opening is crucial – it’s what makes the wind chime actually function as a musical instrument!
Step 3: Add the Bell Clapper (The Sound Maker!)
The clapper is what creates that beautiful chiming sound when it moves in the wind:
Drawing the clapper:
- Draw two parallel lines hanging down from the center of the bell
- Add a small circle at the bottom of these lines
- Add another small circle at the top where it attaches to the bell
- This represents the clapper that strikes the bell to create sound
Clean up:
- Erase the middle portions of the lines where they pass through the bell
- Leave only the visible parts – the attachment point and the hanging clapper
Step 4: Transform the Bell into a Cute Cat Face
Now for the magical transformation – turning our functional wind chime into an adorable cat character!
Drawing the cat ears:
- Add two rounded triangles on top of the circle
- Position them evenly spaced for a balanced look
- To make them look three-dimensional, erase the line on the right ear where it connects to the head
- Draw smaller triangles inside the larger ones to create the inner ears
Adding the cat’s facial features:
- Eyes: Draw two small circles in the upper-middle area of the face
- Snout: Add a small curved line for the snout area
- Nose: Draw a tiny button nose (just a small oval or triangle)
- Mouth: Create a subtle cat mouth with two small curves
Keep the facial features simple and sweet – we want that gentle, peaceful expression that matches the serene nature of wind chimes.
Step 5: Create the Hanging System
Every wind chime needs a way to hang, and ours should look authentic:
Drawing the hanging rope:
- Draw a loop at the top for hanging
- Add some scribbled texture at the lower end to show where the rope is knotted
- This detail makes it look like a real, functional wind chime
Step 6: Design the Paper Streamer (Tanzaku)
The paper streamer is both functional and decorative – it catches the wind and moves the clapper while adding visual appeal:
Creating the paper shape:
- Draw a wavy rectangle hanging from the bell
- Make it slightly wavy to show that it’s fluttering in the wind
- Add a small tab at the top where it connects to the wind chime
- This wavy motion suggests gentle movement in a breeze
Adding the cat tail design:
- Draw a curled tail pattern on the paper
- This connects our cat theme from the bell to the streamer
- Make it flowing and elegant, like traditional Japanese calligraphy
Step 7: Bring Your Cat Wind Chime to Life with Color
Coloring is where our wind chime truly becomes a charming cat character!
Base Colors
The cat bell:
- Color the entire bell with light gray
- Include the clapper and any tail designs in this same light gray
- This creates a cohesive cat color throughout
Inner ear details:
- Fill the inner ears with a soft powder pink
- This adds warmth and realism to the cat features
- Pink inner ears are a classic cute cat characteristic
Adding Realistic Cat Patterns
Creating cat markings:
- Add a lighter gray blob around the snout area
- Draw dark gray stripes on top of the head
- Add dark gray stripes on the left and right sides
- These markings mimic real cat fur patterns and add authenticity
Shading for dimension:
- Color the inside of the bell opening with dark gray
- This creates the shadow effect inside the hollow bell
- Shade the clapper with lighter gray to show it’s inside the shadowed area
Finishing Touches
The paper streamer:
- Color the paper with a soft sky blue
- This choice makes it look like it will blend beautifully with the sky
- Blue also creates nice contrast with the warm gray cat colors
Environmental integration: The blue paper creates the illusion that when the wind chime moves, it becomes part of the sky itself – a beautiful detail that connects the functional and artistic elements!
Bonus: Creating Other Animal Wind Chimes
The beauty of this tutorial is its adaptability! Using the exact same structure, you can create different animal wind chimes just by changing colors and patterns:
Shiba Inu Wind Chime:
- Use golden tan/orange for the main color
- Add white markings on the face and chest
- Change the ear shape to be more pointed and upright
- Add darker orange/brown accents
Fox Wind Chime:
- Use reddish-orange for the main color
- Add a white snout and chest area
- Make the ears more pointed and alert
- Add dark accents around the eyes and ear tips
Other Animals to Try:
- Panda: Black and white with round ears
- Bear: Brown with small round ears
- Bunny: White or gray with long oval ears
- Tiger: Orange with black stripes
- Owl: Brown with large circular “eyes” and pointed ear tufts
Advanced Techniques for Wind Chime Art
Adding motion effects:
- Draw subtle motion lines around the paper streamer
- Add small curved lines to suggest gentle swaying
- Use lighter pressure or dotted lines to show wind movement
Environmental elements:
- Consider adding a few falling leaves or flower petals
- Draw subtle background elements like tree branches
- Add small sparkles or shine effects to suggest sunlight
Seasonal variations:
- Spring: Add cherry blossom patterns to the paper
- Summer: Use cooling blue and white colors
- Autumn: Incorporate maple leaf designs
- Winter: Add snowflake patterns or icicle effects
Cultural Appreciation and Respect
As we create these adorable wind chime drawings, it’s wonderful to appreciate the rich cultural heritage behind them. Japanese furin have been bringing joy, peace, and good fortune to homes for centuries. By creating our own artistic interpretations, we’re celebrating this beautiful tradition while adding our own creative expression.
Consider learning more about Japanese culture, art, and traditions – there’s so much beauty and wisdom to discover that can inspire your artwork in countless ways!
Troubleshooting Common Issues
Problem: My cat face doesn’t look balanced
Solution: Make sure the ears are evenly spaced and the facial features are centered. Use light guidelines if needed.
Problem: The wind chime doesn’t look functional
Solution: Double-check that you have all the essential elements: bell, clapper, hanging cord, and paper streamer. Each serves a real purpose!
Problem: The colors look muddy or unclear
Solution: Use clean, distinct colors and maintain good contrast between the cat features and the background elements.
Problem: The paper streamer looks stiff
Solution: Add more curves and waves to suggest gentle movement. Real fabric and paper move fluidly in wind.
Frequently Asked Questions
Q: Can I make my wind chime a different shape?
A: Yes! While bells are traditional, you could experiment with other shapes while keeping the functional elements (clapper, hanging system, paper streamer).
Q: How do I make it look more three-dimensional?
A: Focus on shading the inside of the bell, adding shadows under overhanging elements, and using color gradients to suggest rounded forms.
Q: Can I add patterns to the paper streamer?
A: Absolutely! Traditional tanzaku often feature beautiful patterns, calligraphy, or seasonal motifs. Let your creativity flow!
Q: What other cultural wind chime styles can I explore?
A: Research wind chimes from different cultures – each has unique characteristics that could inspire your art!
Take Your Wind Chime Art Further
Now that you’ve mastered the cute cat wind chime, explore these related tutorials:
- How to draw Cute Kawaii Dangos
https://drawcartoonstyle.com/how-to-draw-a-cute-kawaii-dango/ - How to draw a Cute Frog Face https://drawcartoonstyle.com/how-to-draw-a-cute-frog-face/
- How to draw a Cute Cat Face
https://drawcartoonstyle.com/how-to-draw-a-cute-cat-face/ - How to draw a Cute Cartoon Fox
https://drawcartoonstyle.com/how-to-draw-a-cute-cartoon-fox/
Share Your Wind Chime Creations!
I’d love to see your adorable wind chime drawings! What animals do you think would make the cutest wind chimes? Have you ever seen or owned a real Japanese furin?
There’s something so peaceful and meditative about both creating art and listening to the gentle sounds of wind chimes. Your drawing captures that same sense of tranquility and brings a little piece of that peaceful feeling to anyone who sees it.
Maybe there are other animals you can think of that would make cute little wind chimes – let me know in the comments! I’m always excited to see how creative our drawing community can be.
More Cultural Art Adventures
If you enjoyed learning how to draw this cute cat Japanese wind chime, visit DrawCartoonstyle.com for more tutorials that blend cultural appreciation with adorable character design. There’s a whole world of beautiful traditions waiting to inspire your next artistic creation!
Happy drawing, and may your art bring you peace like a gentle summer breeze! 🎐🐱
This post includes affiliate links. If you choose to purchase something, I may make a small commission at no extra cost to you. For more information, please read my Privacy Policy.
Leave a Comment