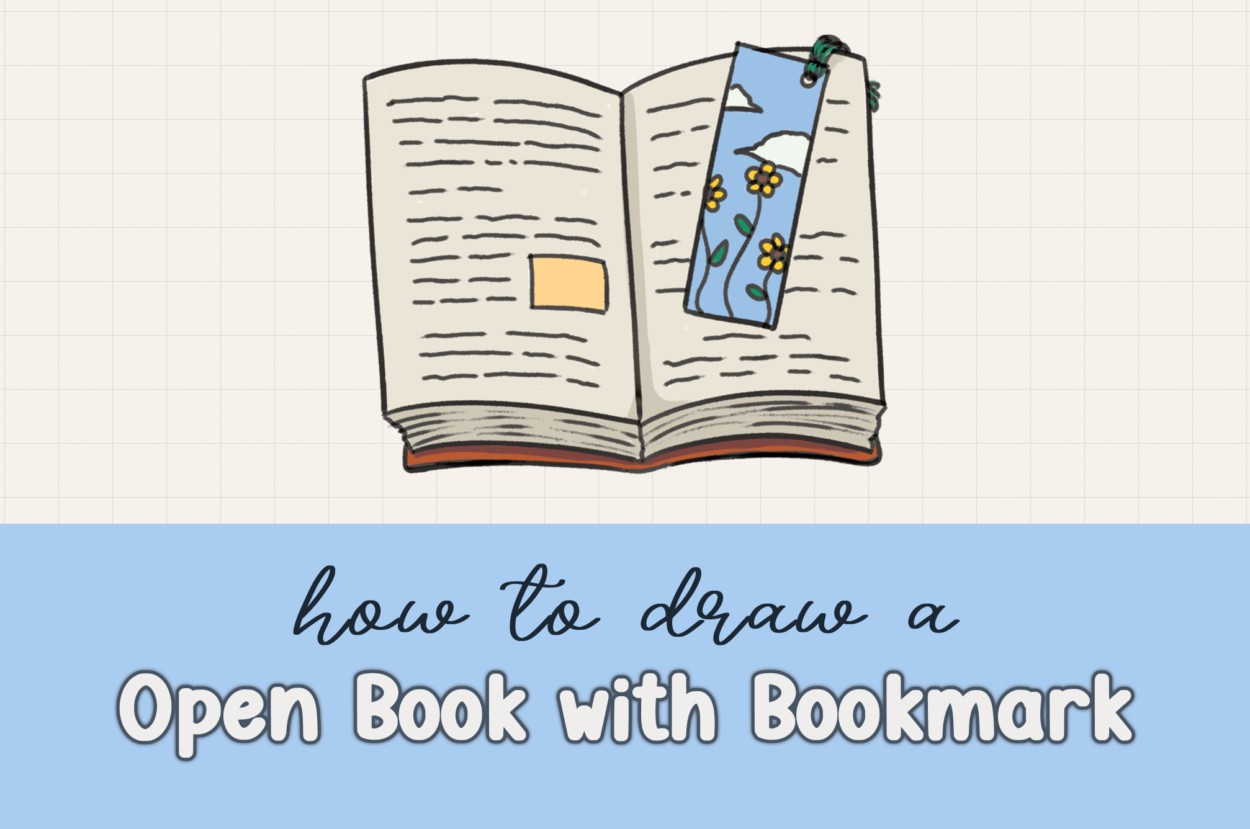
I finished reading an incredible book today, and as I closed the cover, I couldn’t help but reflect on how stories have this amazing power to teach us something new and give us completely different perspectives on our lives. There’s something magical about that moment when you finish a book and feel like you’ve grown, learned, or seen the world through fresh eyes. That beautiful feeling of inspiration from reading motivated me to create something special today – a drawing tutorial for an open book with a bookmark!
Books aren’t just objects; they’re portals to other worlds, teachers of wisdom, and companions in our personal growth journeys. Drawing an open book feels like capturing that moment of discovery when you’re completely absorbed in a story, with your bookmark faithfully holding your place for the next adventure.
In this heartwarming tutorial, I’ll guide you through creating your own open book drawing complete with a personalized bookmark that reflects the beauty of reading and learning. Whether you’re a fellow book lover, a student, a teacher, or someone who simply appreciates the art of storytelling, this drawing will celebrate the timeless joy of books in your life.
Table of Contents
What You’ll Learn in This Book Drawing Tutorial
- How to break down complex 3D objects using simple rectangular foundations
- Step-by-step techniques for drawing realistic open book pages
- Methods for creating depth and dimension in book illustrations
- Detailed bookmark design and customization options
- Professional shading techniques that bring flat drawings to life
- Creative ways to represent book content without overwhelming detail
- Color theory for choosing harmonious, meaningful color palettes
- Adding symbolic elements that enhance storytelling through art
The Art of Drawing Books and Reading
Learning to draw books teaches valuable artistic skills that extend far beyond this single subject:
- Perspective and dimension – books are excellent practice for 3D form
- Layering techniques – multiple pages create complex depth relationships
- Texture representation – paper, covers, and string tassels offer variety
- Symbolic storytelling – books represent knowledge, imagination, and growth
- Detail management – learning when to simplify and when to add complexity
Plus, book drawings are incredibly versatile! Use them for reading journals, library decorations, bookstore art, educational materials, or gifts for fellow book lovers.
Materials You’ll Need
For Digital Drawing:
- Drawing tablet (iPad with Apple Pencil or similar)
- Procreate, Adobe Fresco, or your preferred drawing app
- Fine-tip brush for detailed line work
- Soft brush for shading and color blending
For Traditional Drawing:
- Pencils (2H for light construction, 2B for final details)
- Fine-tip black markers or pens
- Colored pencils, markers, or watercolors in these colors:
- Red (book cover)
- White or light gray (pages)
- Blue (sky elements for bookmark)
- Yellow (sunflower petals)
- Brown (sunflower centers)
- Green (leaves and tassel)
- Light orange (photo/diagram squares)
- Dark gray/black (shadows and depth)
- Good eraser for clean corrections
- Optional: blending tools for smooth transitions
This tutorial works beautifully with any art supplies – from basic classroom materials to professional artist tools!
The Psychology of Reading and Art
Before we start drawing, let’s appreciate the beautiful connection between reading and creativity. Both activities:
- Expand our imagination and help us see new possibilities
- Require focus and patience that builds mental discipline
- Connect us with others through shared stories and experiences
- Provide escape and relaxation from daily stresses
- Inspire personal growth and learning
When we draw books, we’re celebrating these wonderful benefits and creating art that reminds us of the joy of learning!
Step-by-Step Guide: How to Draw an Open Book with Bookmark
Step 1: Simplify Your Book into Basic Shapes
Just like all our tutorials, we’ll start by breaking down this seemingly complex object into simple, manageable shapes. An open book with a bookmark can be simplified into rectangles – that’s the foundation for everything we’ll build!
Understanding the basic structure:
- The book pages form rectangular shapes when open
- The covers extend beyond the pages in rectangular forms
- The bookmark is essentially a decorated rectangle
- Even the tassel can be seen as flowing rectangular strips
This rectangular foundation makes book drawing much more approachable!
Step 2: Create the Open Book Foundation
Drawing the center guideline:
- Start by drawing a vertical line in the center of your paper
- This represents the spine of the open book where pages meet
- This line will guide all your page placement
Creating the first page layer:
- On one side of your center line, draw a curved line extending outward
- At the end of this curve, draw a line going down
- Then curve it back to connect with your center line
- This creates one open page with natural book curvature
Mirroring for the opposite page:
- Repeat the exact same process on the other side of your center line
- Make sure both pages are roughly the same size and shape
- The symmetry creates that classic open book appearance
Step 3: Add Depth with Multiple Page Layers
Real books have many pages, and showing this depth makes your drawing much more realistic and interesting.
Creating the page stack:
- Extend your center line downward to show the book’s thickness
- From this extended line, draw a curved line outward (similar to your first page but slightly behind it)
- Connect this curve with a small upward line back to the book’s edge
Adding realistic page texture:
- Make some of these connecting lines jagged rather than smooth
- Jagged lines suggest multiple pages stacked on top of each other
- This small detail adds tremendous realism to your book
Repeat for both sides:
- Add the same layered page effect to both sides of your book
- Keep the layers consistent for a balanced appearance
Step 4: Draw the Book Covers
The covers give your book structure and provide space for color and design later.
Creating the back cover:
- Draw a small curve a little further down from your center line
- This represents the book’s spine area where it bends
- From this curve, draw a line extending back to connect with your pages
Adding the front cover:
- Repeat this process on the other side
- The covers should extend slightly beyond the pages, just like real books
- Keep the proportions natural and balanced
Step 5: Design Your Bookmark
Now for the fun, personal touch – creating a bookmark that reflects your own style and interests!
Basic bookmark shape:
- Draw a tilted rectangle that appears to be resting between the book pages
- The tilt makes it look naturally placed, not stiffly positioned
- Size it appropriately – not too big or too small for your book
Adding the tassel hole:
- Draw a small hole near the corner of your bookmark
- This is where the decorative tassel will attach
- Keep it proportional to your bookmark size
Step 6: Create a Realistic Tassel
The tassel adds beautiful detail and makes your bookmark look authentic and handmade.
Drawing tassel strings from the hole:
- From within the hole, draw several curved lines extending toward the top of the bookmark
- These represent the tassel strings gathering at the attachment point
Creating the draping effect:
- Draw lines extending outward that look like string or thread draping over the book
- Make these lines flow naturally, following gravity
- Vary the lengths and curves for a realistic appearance
Refining the string texture:
- Erase small sections of some lines to create gaps
- Add slight variations and irregularities to make lines look more string-like
- This attention to detail brings the tassel to life
Adding the tassel tail:
- Draw additional lines coming out from behind the book
- These represent the loose ends of the tassel hanging down
- Keep them flowing and natural-looking
Step 7: Add Page Details and Content
Creating page edge details:
- Draw subtle lines around the page edges to show thickness and layering
- These small details add realism without overwhelming the drawing
Filling the pages with content: Instead of trying to write actual words (which would be too small and detailed), we’ll use artistic representation:
Text representation:
- Use simple scribbles and horizontal lines to represent written content
- Vary the line lengths to suggest paragraphs and text blocks
- Keep it loose and impressionistic rather than literal
Adding visual elements:
- Draw a few small squares to represent photos or diagrams
- These suggest that your book has illustrations or visual content
- Position them naturally within your text areas
Step 8: Personalize Your Bookmark Design
This is where you can really make the drawing your own! I’m going to design mine with flowers because I believe that ideas can bloom better through reading – but you can choose any design that speaks to you.
Sunflower bookmark design (my example):
- Draw simple flower shapes on your bookmark
- Add leaves and stems for a natural garden feel
- Keep the designs simple enough to color easily later
Other bookmark design ideas:
- Books and reading themes: Stack of tiny books, reading glasses, quill pens
- Nature themes: Trees, butterflies, birds, mountains
- Seasonal themes: Autumn leaves, snowflakes, spring flowers, summer suns
- Personal interests: Musical notes, stars, hearts, geometric patterns
- Inspirational symbols: Keys (knowledge unlocks doors), lightbulbs (bright ideas), compasses (finding direction)
Bringing Your Book to Life with Color
Coloring your book drawing is where it transforms from a simple sketch into a meaningful piece of art that celebrates reading and learning.
Choosing Meaningful Colors
Book cover color:
- I’m using red for the book cover because it’s bold, attention-grabbing, and suggests passion for reading
- Other great options: deep blue (wisdom and knowledge), rich green (growth and learning), warm brown (classic and timeless), or purple (creativity and imagination)
Page colors:
- Fill pages with white or very light gray
- This creates the classic book page appearance
- Light colors also provide good contrast for your content details
Bookmark Color Harmony
For my sunflower bookmark design:
Sky background:
- Use a soft blue for the sky areas of your bookmark
- This creates a peaceful, optimistic feeling
- Blue also complements the yellow flowers beautifully
Sunflower details:
- Yellow for the flower petals (sunshine and happiness)
- Brown for the flower centers (natural and grounding)
- Green for leaves and stems (growth and life)
Coordinating the tassel:
- Color the tassel green to match the flower leaves
- This creates color harmony throughout your bookmark design
- Coordinated colors look professional and intentional
Adding Depth with Professional Shading
Shading transforms your flat drawing into a three-dimensional illustration that looks professional and engaging.
Page shadows:
- Add dark color underneath the pages to show they’re casting shadows on the book cover
- This immediately creates the illusion that pages are lifted off the surface
- Use a dark gray or brown for natural-looking shadows
Layered page depth:
- Color the middle and lower page layers with dark gray
- This pushes these layers back visually and emphasizes the top pages
- The contrast between light top pages and darker lower pages creates strong dimensional depth
Photo/diagram details:
- If you added small squares for photos, color them with light orange or another warm color
- This suggests colorful illustrations within your book
- Keep these colors soft so they don’t overpower the main design
Advanced Techniques for Book Illustration
Adding texture:
- Use short pencil strokes to suggest paper grain on pages
- Add subtle lines to suggest book binding
- Consider cross-hatching for deeper shadows
Environmental elements:
- Draw your book on a table or desk surface
- Add surrounding objects like reading glasses, coffee cups, or pencils
- Create a cozy reading scene with pillows or blankets
Multiple books:
- Stack several books for a library or study scene
- Show books from different angles and in various states (open, closed, bookmarked)
- Create a whole reading environment
Symbolism in Your Book Art
Consider the deeper meanings you can incorporate:
- Open books: Knowledge sharing, accessibility of learning, invitation to explore
- Bookmarks: Patience in learning, marking progress, anticipation of return
- Flowers on bookmarks: Growth through reading, ideas blooming, beauty in learning
- Colors: Each color can reinforce themes (blue for calm learning, green for growth, yellow for enlightenment)
Troubleshooting Common Issues
Problem: My book pages look flat and lifeless
Solution: Make sure you’re adding the multiple page layers and using shading to create depth. The shadow underneath is crucial!
Problem: The bookmark doesn’t look like it’s resting naturally in the book
Solution: Adjust the tilt angle and make sure the tassel drapes naturally over the pages. Gravity should influence how everything falls.
Problem: My tassel looks stiff and unrealistic
Solution: Add more variation in the string lines, create some gaps by erasing sections, and make sure the strings flow and curve naturally.
Problem: The overall proportions seem off
Solution: Check that your book covers extend slightly beyond the pages, and that your bookmark is proportional to the book size.
Problem: The colors look muddy or clash
Solution: Choose a simple color scheme with 3-4 main colors that work well together. Earth tones and nature colors usually harmonize nicely.
Frequently Asked Questions
Q: Can I draw a closed book instead?
A: Absolutely! Use the same rectangular foundation but eliminate the open page elements. Focus on the cover design and spine details.
Q: How do I make my book look like a specific genre?
A: Adjust colors and bookmark designs – dark, gothic colors for mystery, bright pastels for romance, earth tones for nature guides, etc.
Q: Can I add text that’s actually readable?
A: For larger drawings, yes! But keep text simple and legible. For smaller drawings, scribbles work better visually.
Q: What if I want to draw an e-reader or tablet instead?
A: Use the same rectangular foundation but add screen details, buttons, and modern technological elements instead of pages.
Q: How do I make my bookmark design more detailed? A: Start with simple shapes and gradually add complexity. Remember that very intricate details might be hard to see at this scale.
Take Your Book Art Further
Now that you’ve mastered drawing an open book with bookmark, explore these related tutorials:
- How to draw a Cute Mushroom House https://drawcartoonstyle.com/how-to-draw-a-cute-mushroom-house/
- How to draw an Easy Castle
https://drawcartoonstyle.com/easy-castle-drawing/ - How to draw We Bare Bears Stack https://drawcartoonstyle.com/how-to-draw-we-bare-bears/
Share Your Book Drawing!
I’d love to see your open book creations! What story did you mark in your imaginary book today? What design did you choose for your bookmark, and what does it represent to you?
There’s something beautiful about creating art that celebrates reading and learning. Your drawing represents not just a book, but all the wonderful stories, lessons, and adventures that books bring into our lives. Every time you look at your finished artwork, let it remind you of the magic that happens when we open a book and let our imagination soar.
Books have the power to change us, teach us, and inspire us – and now you’ve created a piece of art that celebrates that incredible power. Whether this drawing goes in your reading journal, on your bedroom wall, or as a gift for a fellow book lover, it carries with it the spirit of curiosity, learning, and the endless joy of storytelling.
More Literary Art Adventures
If you enjoyed learning how to draw this open book with bookmark, visit DrawCartoonstyle.com for more tutorials that celebrate reading, learning, and the beautiful world of books and stories. There’s always a new artistic adventure waiting to unfold!
Happy drawing, and happy reading! 📚✨
This post includes affiliate links. If you choose to purchase something, I may make a small commission at no extra cost to you. For more information, please read my Privacy Policy.

Leave a Comment