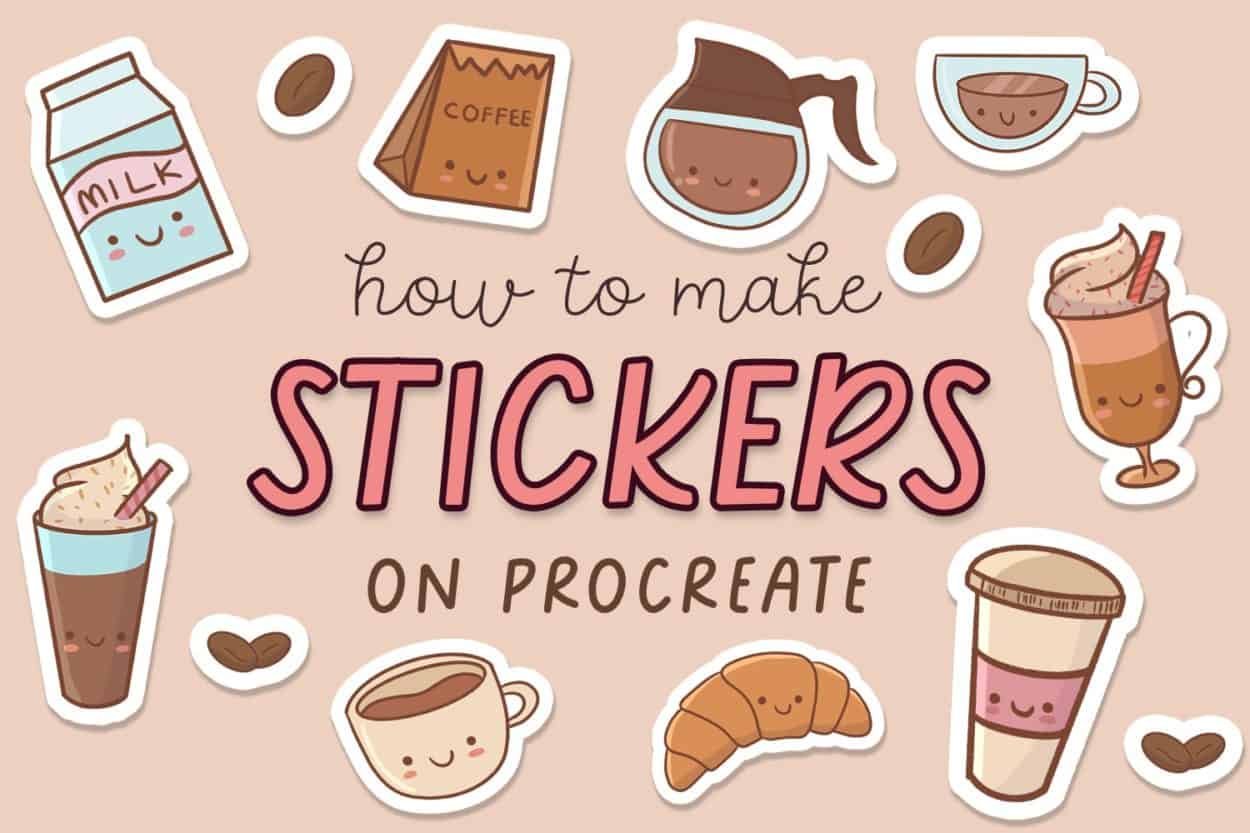
You love cute stickers.
You also love drawing and have been wondering how to make stickers on Procreate.
But you don’t want to spend too much money because you just want to try it out first.
And you’re looking for an easy way to do this.
You’ve come to the right place!
I searched for many videos and tutorials because I, too, was interested in making cute stickers for Procreate.
But honestly?
Everything overwhelmed me.
There were too many sticker sheets to buy and too many expensive products involved.
I just wanted an easy to make stickers on Procreate and print stickers at home so I could have some fun with them!
So, in today’s post, I’m going to teach you how to make stickers on Procreate and print them at home so you can do it quickly and easily!
I will be explaining how to make stickers on Procreate without Cricut.
If you want to use Cricut, I will point you to a resource to help you with that too.
Here is what you will be learning in today’s post:
- Tools you need to make stickers
- How to draw the stickers on Procreate
- How to create the white outline of the stickers
- Printing the stickers
I will be explaining everything step by step so that it won’t be confusing. So, bookmark this post and keep coming back to it if you have doubts.
But before I get into the post, please take a moment to subscribe to my weekly newsletter, where I send all kinds of drawing tutorials, drawing worksheets, and drawing resources like courses and books:
It’s the perfect opportunity to get inspired and be consistent with drawing!
[convertkit form=3083431]
Let’s begin.
This post includes affiliate links. If you do decide to purchase something, I will make a commission at no extra cost to you. For more information, please read my entire Privacy Policy here.
Table of Contents
Tools you will require to make your own stickers at home
1. iPad Pro 12.9″
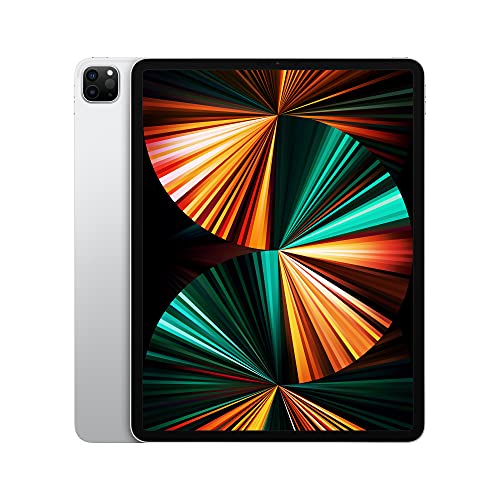
I use an iPad Pro 12.9″ for all my illustrations and drawings.
It’s by far one of the best tools I’ve worked with my whole life. I explain how nicely I was able to transition from traditional art to digital art and why I find digital art so easy here.
I also use an Apple Pencil to draw.
But you can use any 3rd party stylus if an Apple Pencil is too expensive at the moment. Here are a few I recommend:
2. Procreate App
This app just costs $10, and it’s a one-time fee.
There are no hidden fees or monthly charges whatsoever!
In my opinion, it’s the best drawing app, and it’s super easy to use – even for people who have never drawn before!
I just took this inexpensive Procreate class to learn everything about Procreate in 1 day. It took me about a week to get familiar with it, and I have not turned back since!
You can check out my post here on how I draw and color my digital art using Procreate.
Note: All the brushes I use in Procreate are free and come with Procreate. There’s no need to buy any additional brushes for this tutorial.
3. Canon Pixma MG3620
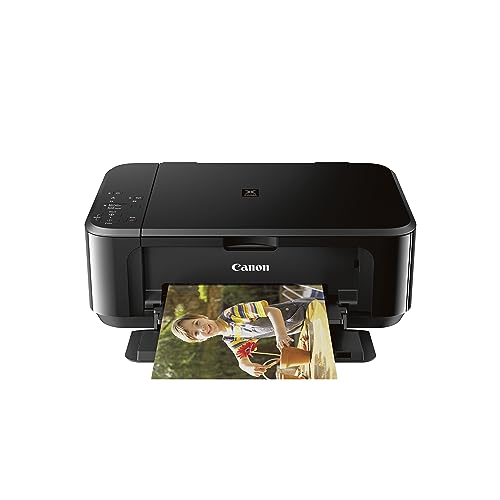
I highly recommend this printer because it prints very beautiful stickers. It’s a 1-time cost, and you can use it for all your printing needs.
One of the benefits of using this Canon printer is that when you use genuine Canon ink cartridges with the printer, you will get amazing quality printed stickers that don’t smudge.
So, make sure you buy good quality cartridges released by Canon itself!
The printer is currently very cheap, and you can check out the printer here.
4. Sticker Paper

You will need to print your stickers on sticker paper so that you can stick your stickers.
Here’s what you need to check when buying sticker paper to make Procreate Stickers:
- It needs to be Inkjet compatible so that the printer ink doesn’t run on the paper
- It has to be waterproof (so you can stick it on water bottles without fear of it crumbling or peeling)
- Your sticker paper should preferably be vinyl glossy sticker paper
This is the best sticker paper I’ve found that is not too expensive.
If you want to save money on sticker paper, then print your stickers on regular paper and glue them to your notebooks.
But the glue can harm the stickers or cause those weird little bumps – you also cannot stick it easily on laptops and other surfaces.
So, if you want good-quality stickers, I highly recommend getting high-quality sticker paper. It isn’t that expensive if you just want to print a few stickers occasionally.
Note: This is the best sticker paper, according to me.
Additional Supplies
These aren’t required or necessary for this project.
But it will make your drawing and sticker creation process very easy.
1. Cricut
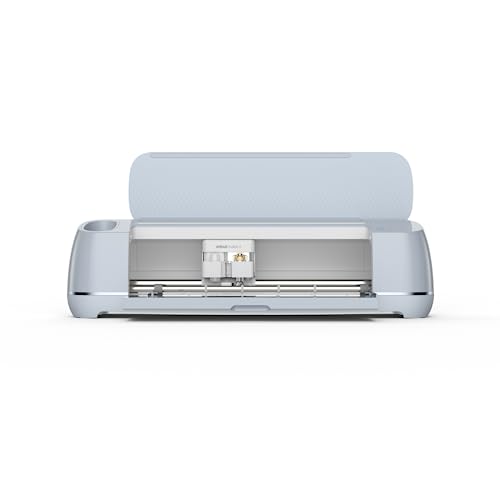
Remember, it’s not required for this process.
I am teaching you a method where you can use your scissors to cut the stickers.
But if you want to produce stickers in huge volumes or sell them on your Etsy shop, then you can get a Cricut to make things easier.
Let’s move on to drawing the stickers.
Step 1: Drawing the stickers on Procreate
Right now, let’s just focus on drawing the stickers.
This stage involves:
- Creating the rough sketches of the stickers
- Drawing the stickers on Procreate
1. Create the rough sketches of the stickers
I never work on Procreate directly.
I like to make rough sketches of the stickers first before I start working directly on my digital art.
So, I will first draw some rough sketches of the stickers I want to create on a rough piece of paper.
For this project, I want to make some coffee-themed Procreate stickers.
So, I’ll take a few minutes just to draw a couple of items first.
If you’re stuck drawing stickers, just refer to all my kawaii drawing tutorials here for ideas. You can also look at references for coffee on Google to get ideas about the different types of coffee to make stickers.

Note: Your rough sketches don’t need to be perfect. It’s okay if it’s messy because this is not going to show in our final stickers.
2. Draw the individual stickers on Procreate
I’m not going to compile the sticker sheet yet.
I want to draw the stickers first.
I like to draw each sticker individually.
So, what I do is open a blank canvas of 1000px x1000px at 300 DPI. 150DPI also works if you lack memory space on your Procreate.
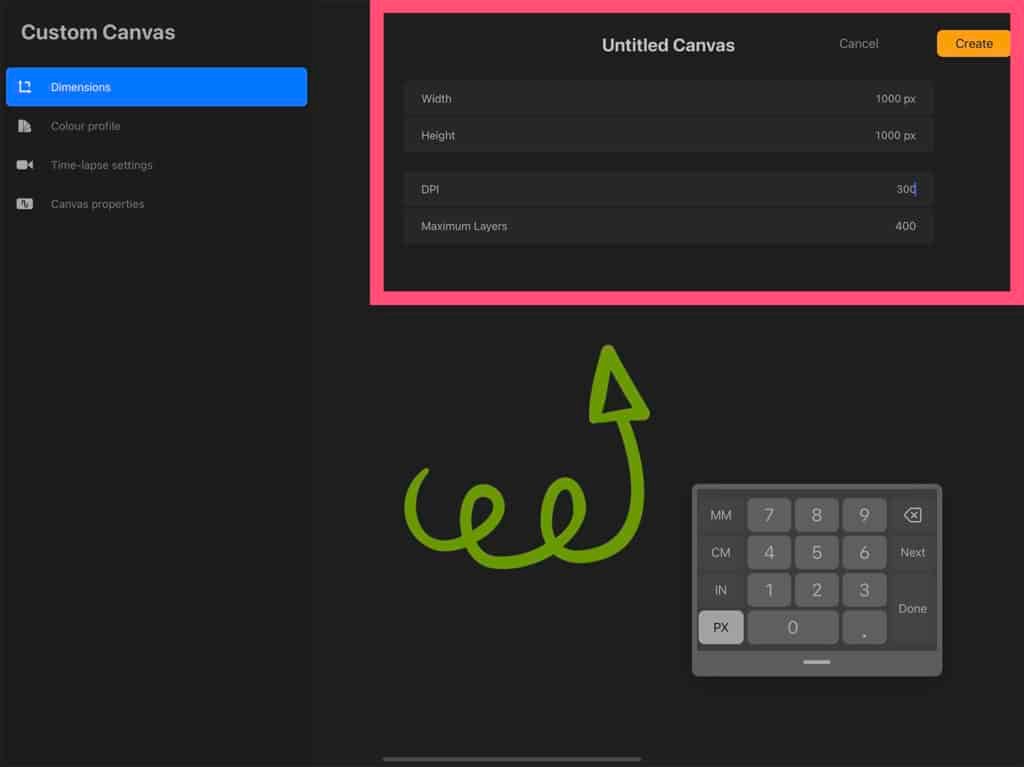
Please note that we need a large canvas because we require our stickers to look like they’re very good quality.
Now, on a new layer, I will draw the outline of the sticker.
I use the dry ink brush to draw my outline.
You will find the Dry Ink brush in Inking brushes and it’s free in Procreate.

I like using this brown color for the outline because it gives a very kawaii look to my stickers.
I will now make this my reference layer.
Just single tap this outline layer and select “Reference.” Now, I can drag and drop colors easily on a new layer without touching the outline layer, and it will fill the components inside the outline layer.
Now, create a new layer underneath the outline layer.
Using the drag and drop method, I will color the coffee cup like so:

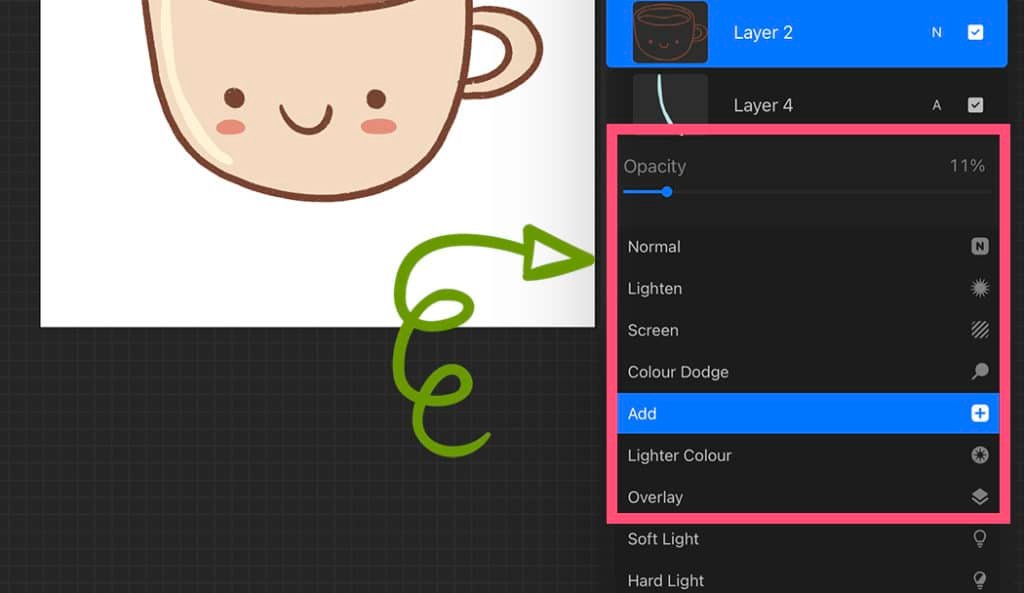
On a new layer, I will add the highlight.
I just use a bright blue like this and use the Studio Pen (found in Inking for free) and I will just draw a small line on the edge of the cup to give that shining effect to the cup.

Now, I will change the blending mode (hit the N on the layer) of the layer to Add and change the opacity to 10%.
And voila! I’m done creating 1 sticker in Procreate.
I will group the 3 layers into 1 group just to make things easier for me, and I will name it Americano.
I will remove the background (by unchecking the background box) and save this image as a PNG in my photos.
To save the image to your Photos in Procreate:
- Click the wrench icon on your top left.
- Select Share and “PNG” under Share.
- Select “Save Image”
- You will get a notification “Export Successful”
And you have successfully saved the image from Procreate to your Photos app.
Note: If you want to make stickers in Procreate for Redbubble, just upload this image (without the background) in a PNG format to Redbubble because Redbubble prefers images with transparent backgrounds for teeshirts and stickers.
I will repeat the same procedure for each individual sticker in Procreate – creating multiple images and saving them separately on my Photos app.
You can make about 9-12 stickers because that’s how many will fit on your sheet.
If you’re making bigger stickers, then 3-4 will suffice.
Take your time with this; it’s okay if you take a day or more.
Just remember to have fun.
Step 2: Making your Sticker Sheet
Now, it’s time to make your sticker sheet.
We need to assemble all the stickers in 1 sheet so we can print this.
Now, we’ve already created individual stickers in Procreate and saved them to photos.
At this stage, we are going to:
- Import the stickers into a new sheet
- Outline each sticker with a white border
1. Create the canvas in Procreate
The first thing you’ll want to do is select the size of the sticker sheet.
Open Procreate and hit the + icon.
Select a Canvas size of 2550 pixels x 3300 pixels which is (8.5″ x 11″) this many inches.
Things to note about creating a canvas for your stickers:
- Please select CMYK because printers only print in CMYK format. You can select this in the color profile.
- Select 300 DPI (even 150 DPI works).

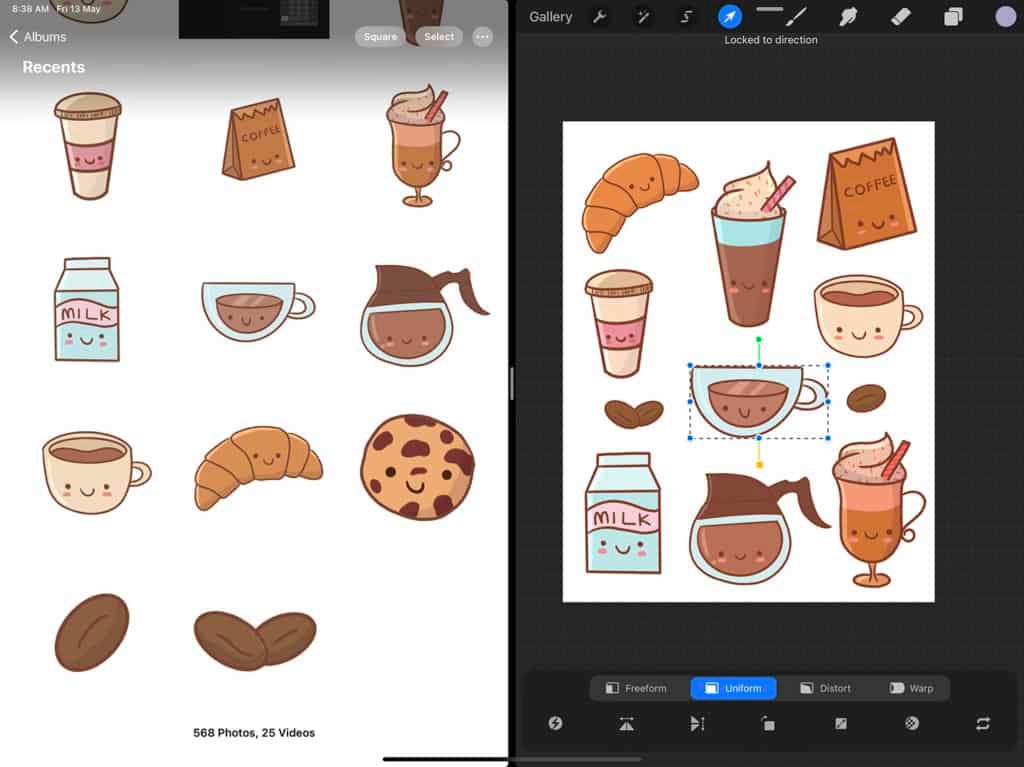
2. Drag the stickers onto the sticker sheet
Keep your Photos app in the toolbar below and drag and drop the Photo App next to the Procreate app to open it side by side.
You can take a look at this tutorial here if you’re having difficulty doing that.
You should get something like this:

Now, drag each image to the sticker sheet, adjust the image’s dimensions, and arrange them neatly on the sticker sheet.
Alternatively, you can just go to settings and select “Add” and then select “Insert Photo” in Procreate to add the images one by one to your canvas.
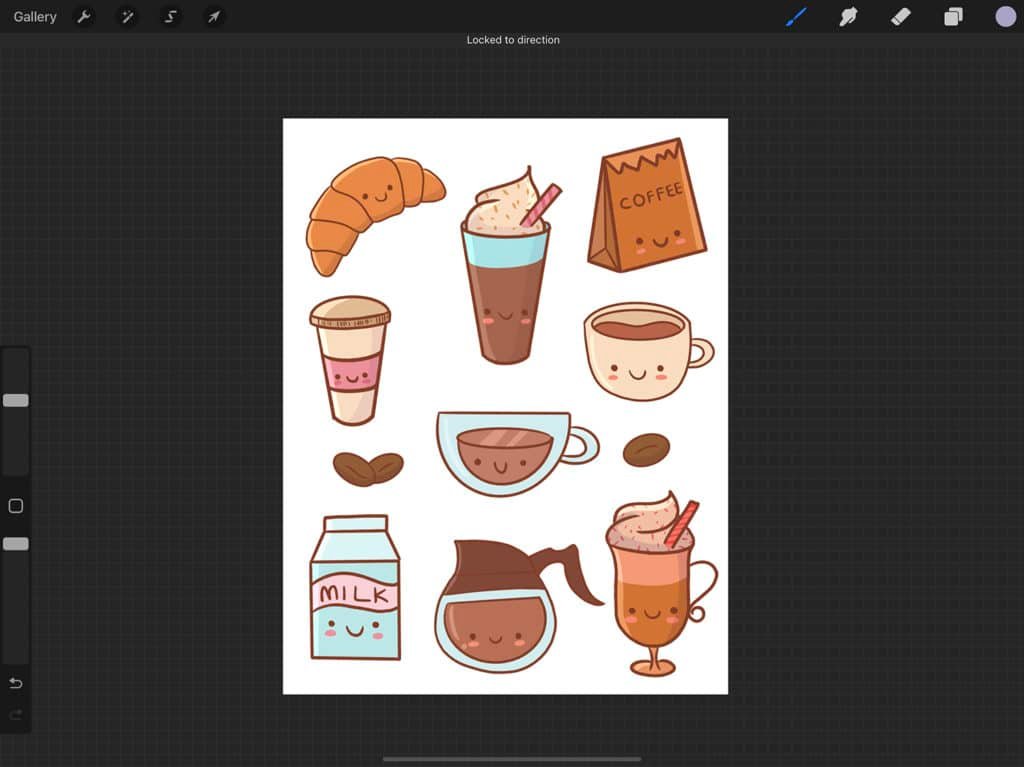
Make sure that there is enough space between the stickers.
If you’re unable to fit in everything, that’s okay! We can make another sticker sheet with the rest. So, don’t try to overcrowd it all.
Once you’ve arranged your stickers on your canvas, you should get something like this:
Step 3: Outlining your stickers
1. Create an outline for your stickers
Please skip this step if you are going to use scissors to cut out your stickers. You don’t need to draw an outline for your stickers.
Now, your layers should look like this on your sticker sheet, with each individual sticker on a separate layer.
I’m just going to remove the background by unchecking the background layer – this will help me draw the white outline easily.
So, I will create the outline layer on a new layer underneath all the layers.
Watch this video to understand how I draw the outline around each sticker:
You need to create a white outline for each sticker because if at all you are using a Cricut or Silhouette machine, the outline will help the machines cut around it.
Even if you are using plain scissors, you can cut around the stickers easily if you have the white outlines.
Using the Monoline brush under Calligraphy, slowly outline each sticker on the layer underneath the stickers with white. It’s preferable that it’s wide.
Feel free to toggle the stickers on and off so that you can see your outline clearly.
Once you’re done outlining the sticker, drag and drop the white color to the shape you’ve just created so that the entire shape is white. This is the same approach we used to color the stickers.
This is what it will look like:

2. Save your sticker sheet
If you are using Cricut or Silhouette, you will need to merge all the layers together.
Using your fingers, simply pinch the layers together on the layers tab, so all the layers merge into one.
Remember, your background should still be off.
Using the above-mentioned method, just hit the Wrench icon and select “Share.”
Click on “PNG” below that to export a PNG to your laptop for printing or to your Cricut Design Space if you’re using Cricut.
Step 4: Printing your stickers
Here are the tools you need to print your stickers:
- Printer
- Sticker Paper I recommend for glossy stickers
- Sticker Paper I recommend for holographic stickers
- Cricut to cut out the stickers (optional)
If you do not want to go through the hassle of using a Cricut, you can use a pair of scissors to cut all of the stickers.
If you want to use Cricut, watch this Youtube Video to understand how to use Cricut to cut your stickers.
Again, if you’re a hobby craftsperson and just want to have fun and experiment with stickers, you do not need a Cricut.
You can manually cut them by using pair of scissors.
If you are planning on selling a lot of stickers and you really need the volume, then cutting your stickers manually is going to be really challenging.
I highly recommend getting a Silhouette or Cricut in this case.

Conclusion
I hope this post helped you understand how to make your own cute stickers on Procreate. Please leave a comment below if you have more questions.
I’m more than happy to help!
If you are interested in drawing in a kawaii style and then selling clipart or merchandise on Etsy, check out this course!

My old bud Ilaria (we’ve been friends on Instagram back when I had Instagram) created this course! I’ve watched her grow from 0 followers, and I’m so, so proud of her!
And believe it or not, there is not 1 single good online course about learning how to draw kawaii art and then making physical stickers on the internet. I’ve been looking for a course like this for a long, long time.
And it’s finally here!!!
You can create your own stickers and print them and sell them on Etsy or any space! She goes into detail about how to draw the characters.
This is by far one of the best courses I’ve taken that is so cute and so educational.
The course is in English, and it’s amazing!
What do you need?
A sketchbook, Photoshop, and a graphic tablet so that you can draw the kawaii characters. If you want to make stickers, you’ll need a printer and sticker sheets.
Even if you don’t want to make stickers and just draw kawaii characters, this course is perfect!
This is by far one of the best courses I’ve taken that is so cute and so educational.
The course is in English, and it’s amazing!
Frequently Asked Questions
I understand that you may have additional questions, so I’ll try answering them here.
How to make transparent stickers on Procreate?
Toggle the background layer off by unchecking the background layer box. This will make your stickers transparent.
How to make stickers on Procreate and Cricut?
Once you’ve finished saving the Sticker Sheet in Procreate as a PNG, simply upload it to the Cricut Design Space.
Watch this video to understand how to print your stickers and use Cricut to cut them.
How to make holographic stickers on Procreate?
The easiest way is to just use holographic sticker paper like this when printing your stickers on Procreate.
How to make your stickers waterproof?
This sticker paper right here is waterproof, so you don’t need to do anything else extra to get waterproof stickers.


Leave a Comment